LOL LOVE TO!!! But gotta do things that make the money … rather retire and work on this stuff…
Not sure what I’m doing wrong… I downloaded the img file again… formatted the SD card and installed the img with Win32DiskImager… all writes ok and ends as it should.
Start Paragon ExtFS and try to read the SD card… no go. NOW it tells me : “Corrupted”…
I can’t imagine having this much trouble… I have formatted and put the img on now this will be my 6th time.[and yes I have used different SD cards]… It’s just not allowing me to change any file period. Paragon will not allow me access to it and other programs as well. I’m pretty sure all the SD cards I own aren’t bad…
I even took the card to a Linux machine and again, no go. It’s either has errors or it tells me I cannot because I don’t have root access to change the file…
There has to be a way to do this…
FOUND the problem! I believe. I burned the img to a regular USB stick and I can read it with no issue… which means the SD card reader is bad… I believe it’s what’s causing all my issues… SO while I’m at lunch today I will go get a new one.
Fingers crossed! 
We have seen so many times issues with other SD cards, thats why we give HestiaPi with that specific type and brand (Im not gonna say it - see the pictures :))
I was going to suggest to try only the supplied SD card again, but your suggestion confirms all the issues you have seen so it makes sense. I can also suggest (I’ve seen it a few times in the hackerspace) you try restarting your PC before trying again but you have done this indirectly by shutting it down during the days you have been testing.
1 Like
Gentlemen…we have liftoff!!!
I took the NEW SD reader after I put the img on … over to my MagicMirror machine [Linux] and used Nautilus…with that I can write to any file… entered my info and BOOM… I have an ip and mac… waiting for it to load now…
I am now able to run the openhab and ssh’ed into it… so now to get it working as a thermostat so I can start figuring out the MM module…  Thank you for ALL your patience and kindness so far.
PS tried ALL the Windows programs …Paragon…etc…they well are not impressive LOL
Glad to here that. Happy hacking
Well yeah but have we figured out the actual wiring for thermostat?
You said your system is not using 24V, so it must be 110V.
Have you checked that the default functionality is not working for you?
I will look into that… my celebration was premature…
It’s still sitting at the Logo with the IP and Mac address and says Loading…
Been that way for over 10 hours… what should I do? If I restart it by turning it off it never loads again when I restart…
I thought so when I realised you had enough time to write your other post while “waiting” for it to load.
The image is auto expanding the partitions to occupy all SD’s physical space and this sometimes causes problems on the load.
Do you mind removing the mains power, waiting 10 seconds and connect mains again? Believe it or not, it is very rare to corrupt the card if the Hestia is idling and the original SD card and image were used. It is optimised to avoid any usage of the SD for logging and temp files.
We do it all the time and we never got any issue. Please report back.
Loading shouldn’t take longer than the actual countdown…
Ok, sounds good. Will give it a go and report back Thank you for the input.
Here’s where it stands… [I even updated the above loader script] and it gets as far and Loading where it shows the IP and MAC addresses and that’s it. It gets stuck right there.
I can SSH into it but can’t get it to load any further…
Suggestions?
OK, let’s do it the hard way then…
SSH into it and type
killall chromium-browser
The “Loading…” (not) page should disappear and you should see the Desktop.
Locate the single shortcut on the top left corner “Chromium” and double tap it. You may need to triple tap it as the resistive screen is optimised to work with single taps only and filters out fast double taps.
If done correctly you should see the CPU load graph at the bottom to reach the top for a few seconds till you see Chromium load. Hit the x of the “Restore pages?” prompt.
Tap on the HestiaPi bookmark on the bookmarks bar.
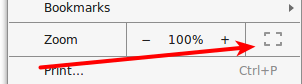
Tap on the Chromium menu icon (three dots)
![]()
And tap on the fullscreen icon next to the Zoom and 100% icons
Let me know how it went.
Please keep in mind a more optimised UI with better controls and greater responsiveness is in the plan but as OpenHAB is an open platform, feel free to tweak it your way.
To change it easily from your laptop see this post:
Good Morning and first off if you’re a Dad… Happy Father’s Day!! 
Second…even before I could get to anything you just posted … I restarted the Therm and it had the countdown BUT the difference was this time the Chromium screen also showed up on top of the countdown [never did that before]… So I hit the x to close and not restore…
I let the countdown go to the end and what do you know… it actually loaded this time!!! YOU can’t make this stuff up LOL
The difference was it gave me the screen before anything so I told it NOT to restore… interesting. Well now to play with it and get it hooked up to my heat…
Looking forward to the update as mentioned above… and the case. Are you any closer on that?
Thanks again!
Thank you for your wishes
The reason why you got the “restore” popup was the fact that you forcibly closed Chromium by restarting so it complains. This is actually a bug on Chromium as there is a parameter to bypass this message but it is ignored even though I use it.
The new case was actually designed and tested in prototype 2 weeks ago but my designer hasn’t got round in designing it for 3D printing (STL) for me so that I could do the final test and release it with the rest on the website.
1 Like
Sorry for the massive delay. I have been out of state on family matters.
I have been able to install the new image and have it boot up. I have not connected it yet to the wiring.
To confirm:
- I am running a 24v system with Heating and Cooling so I need to modify the PCB outlined above
- I have the following wires:
Green: Fan
White: Heat
Yellow: Air Conditioning
Red: RH/RC Red heat/Red cool (24AVC)
3, What is the recommended wiring guidelines?
If this doesn’t work with the current unit, I am more than happy to purchase your US unit.
John
Hello John,
the current unit only supports 2 contacts, that is 2 wires. In order to make it work will require some basic electronics knowledge and some soldering to modify the PCB. I can give you some guidelines if you are happy to go that way. I understand this isn’t everyone’s cup of tea. Another “solution” is to combine the fan with the heat during winter and change this during summer to combine the fan with the AC. If this is allowed by your system, is something you need to check yourself and feel confident.
The US unit is not really sellable yet. It supports your system and your requirements out of the box but there is a lot of tuning needed to be able to actually sell it without sending everyone to the forum for help how it can work with their system.
I’ve been looking but is there documentation on how to change the display from C to F…
Sorry for disappearing… See solution here:
Well you are allowed a vacation