Instead of getting humidity and temperature readings I’m getting the following error from bme280.py.
Traceback (most recent call last):
  File "./bme280C.py", line 173, in <module>
    main()
  File "./bme280C.py", line 161, in main
    (chip_id, chip_version) = readBME280ID()
  File "./bme280C.py", line 56, in readBME280ID
    (chip_id, chip_version) = bus.read_i2c_block_data(addr, REG_ID, 2)
IOError: [Errno 121] Remote I/O error
I’ve tried all three of the bme280 scripts and I’ve tried shutting the machine down and unplugging and replugging in the sensor (both ends of the wires) and I get the same results.
If calling /home/pi/scripts/getBMEtemp.sh
as user pi gives you the error you mention, then I assume we have a bad solder point.
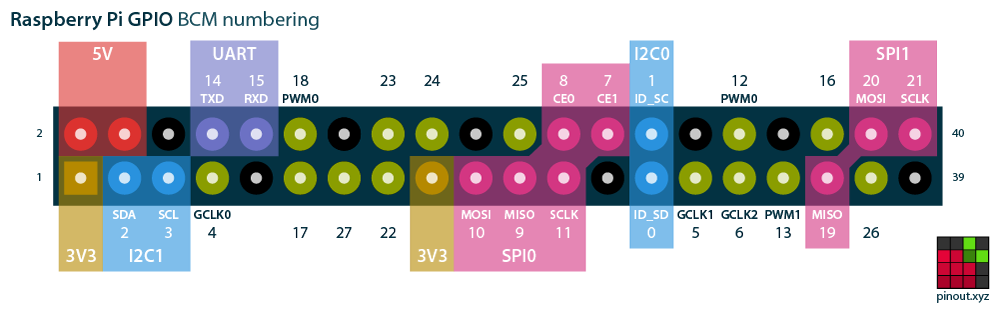
If you can solder, simply refresh SDA and SCL (I2C1) pins from the bottom of the PCB at the Pi’s location (not the LCD). Try and allow the solder to flow in the solder hole of the pin by holding the PCB flat with the solder points facing upwards and simply reheating for 3-4 seconds with a fine soldering tip.
This soldering technique even though it saves space, it caused many issues as some points appeared ok with continuity test before shipping. When the PCB was designed Raspberry Pi Foundation offered Zero W without the headers which made this soldering method very easy. After some months RPi Zero W was only available with the headers presoldered but we thought we could get away with it
FYI the I2C protocol does not need restarting the Pi if you remove/connect the sensor. Simply rerun the command while debugging. Also the sensor should not get damaged if the ribbon cable is inserted at the opposite direction.
I’ve called it as pi, root and openhab (the latter two using sudo).
That’s very good to know. I wasn’t sure so I wanted to eliminate any possibility of something going wrong.
I’ll try to refresh the soldering over the coming days and see what happens and report back here. Thanks for the help! I’ve some workarounds if I can’t make this work by resoldering.
I just wanted to give an update on this. I resoldered all the RPi GPIO pins on the underside of the HestiaPi board, basically melting the solder again so it flows down. That has corrected the sensor which is once again reporting values.
However, I noticed that the LCD screen is not responding to touch. Is there a different set of solder points I need to re-flow for that?
Hmmm. I reflowed all of the RPi 0 pins, not just the ones for the sensor. Still no touch on the LCD. I saw on another thread there might be some issues with the LCD if the incoming voltage is too high. I’ll hook up a voltage meter to see if the power supply I’m using is producing higher than advertised voltage.
It’s not that big of a deal, but I’d like it to work so my test unit is fully functional and so i can mess with the UI on it.
Before trying a known good LCD (from your other HestiaPi) can you confirm continuity between each and every male pin of Pi and LCD header?
Lastly, with the Pi off, insert as far as it goes the LCD directly on the Pi’s header. The relays are stopping it for staying flat but under normal circumstances this is no problem. Check again for touch issues.
If the LCD is removed from the front cover and inserted by hand make sure they are centre aligned as the connector allows the pins to misalign and this may damage (further?) the LCD.