Debian 12 (bookworm) image testing (v1.5-dev)

Wow, I certainly did not expect setting it to zero to be “on”. Thanks for testing that out for me.

I haven’t managed to make time to patch this up, but I expect it should just be a minor change to the rules (or maybe a script?). Once I think I have it figured out, I’ll post a change here that people can make for testing before I go off and re-build an entire new image.

That is not the case for my (crowdfunded) hardware.

Relays boot at low.

Setting it at 0, does nothing.

Setting it at 1, clicks and LED goes ON.

Shutting HestiaPi down by ssh (sudo shutdown -h now) turns relays off.

Maybe in a very old hardware the wiring was different but I’m pretty sure this is not the case now. Old wiring caused all relays to go high when you shutdown and till HestiaPi booted fully, but as I said this is very old. A few years before the Crowdfunding (2019).
Can you show us @cheeseyone1 your PCB and relay wiring?

Hi Hacker ,

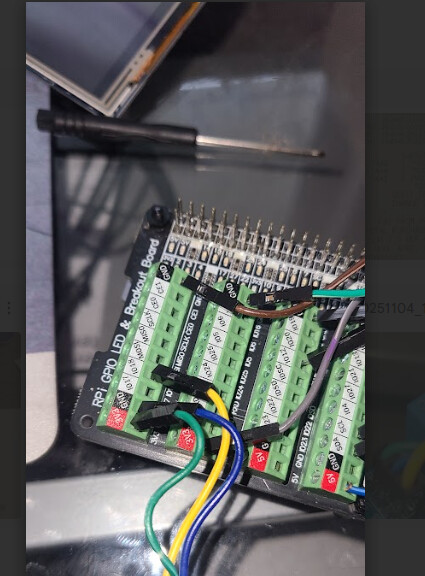
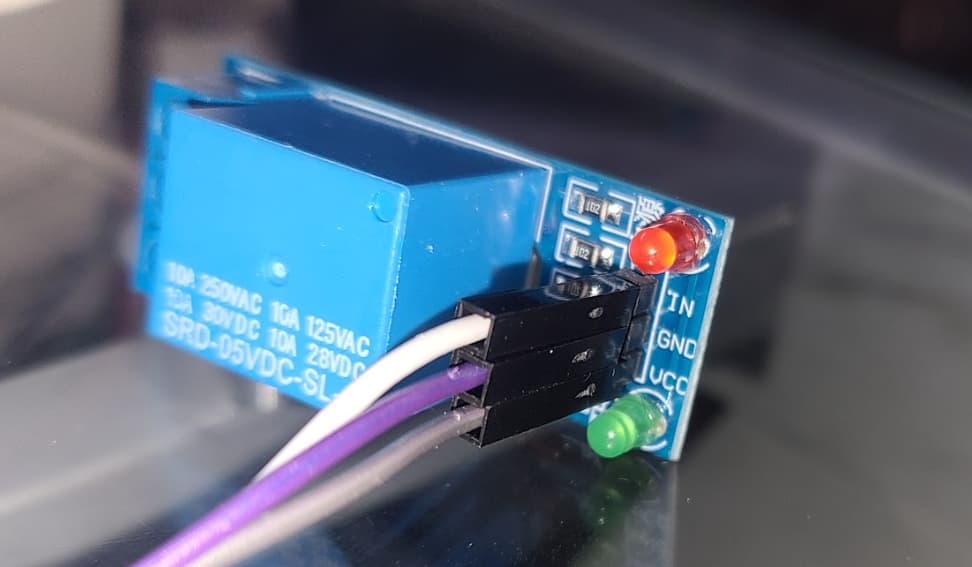
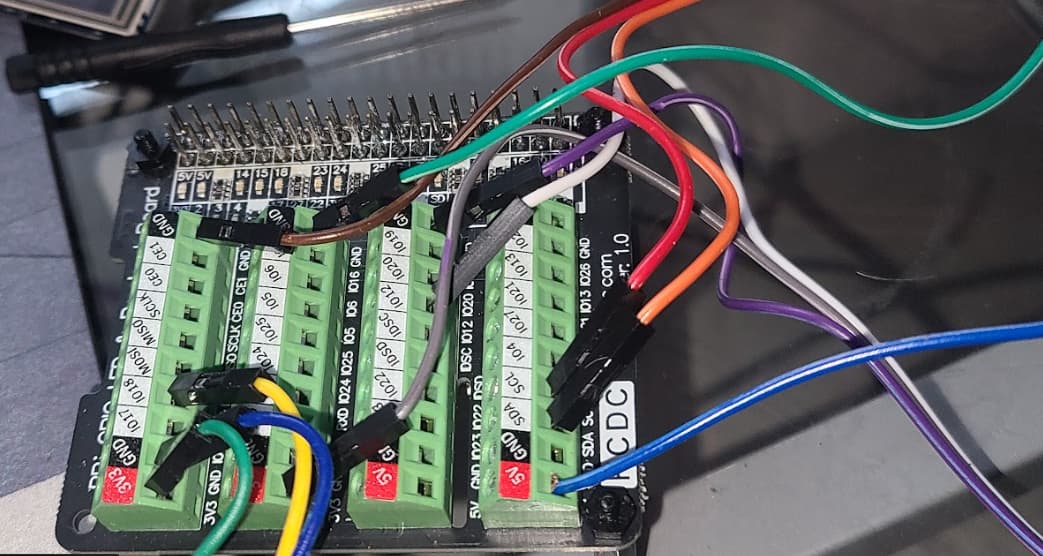
Looking at my relays I unfortunately got a batch of active low . They change state fine and also on shutdown or loss of power the relays are off . I am using a generic pi hat for a breakout board

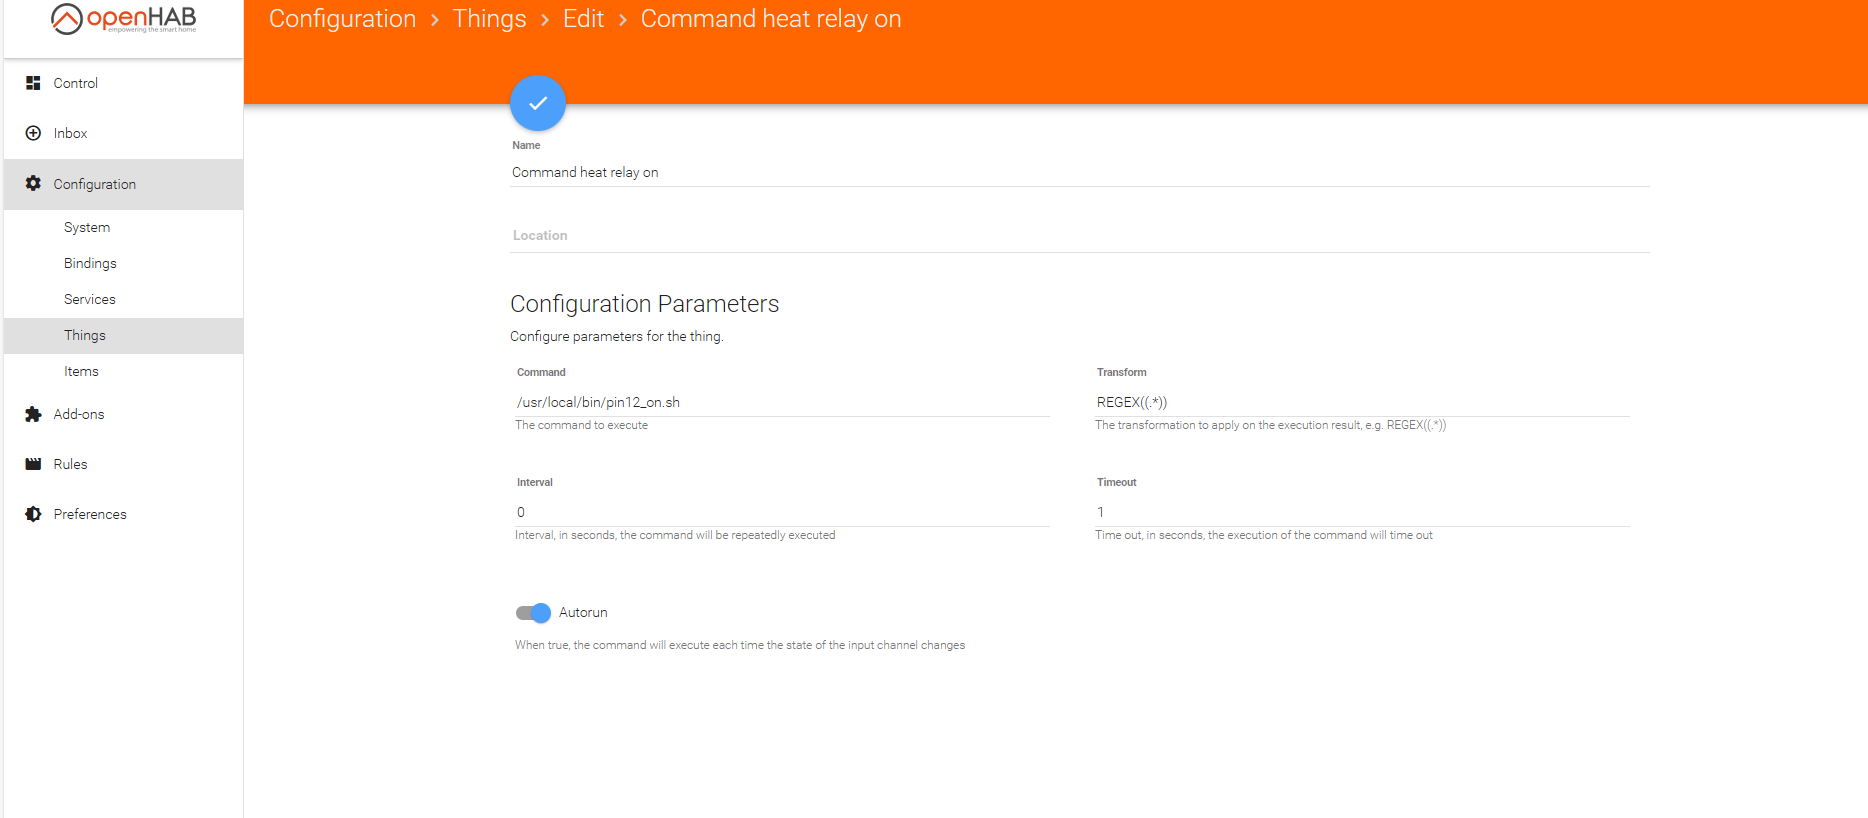
For setting of gpio I am using a bash script saved in usr/bin/pin_12 on or off which has

#!/bin/bash

/usr/bin/gpioset gpiochip0 12=1
the exec script can control the pin to do what I need it to do . I only need to call the scipt to turn the output on or off

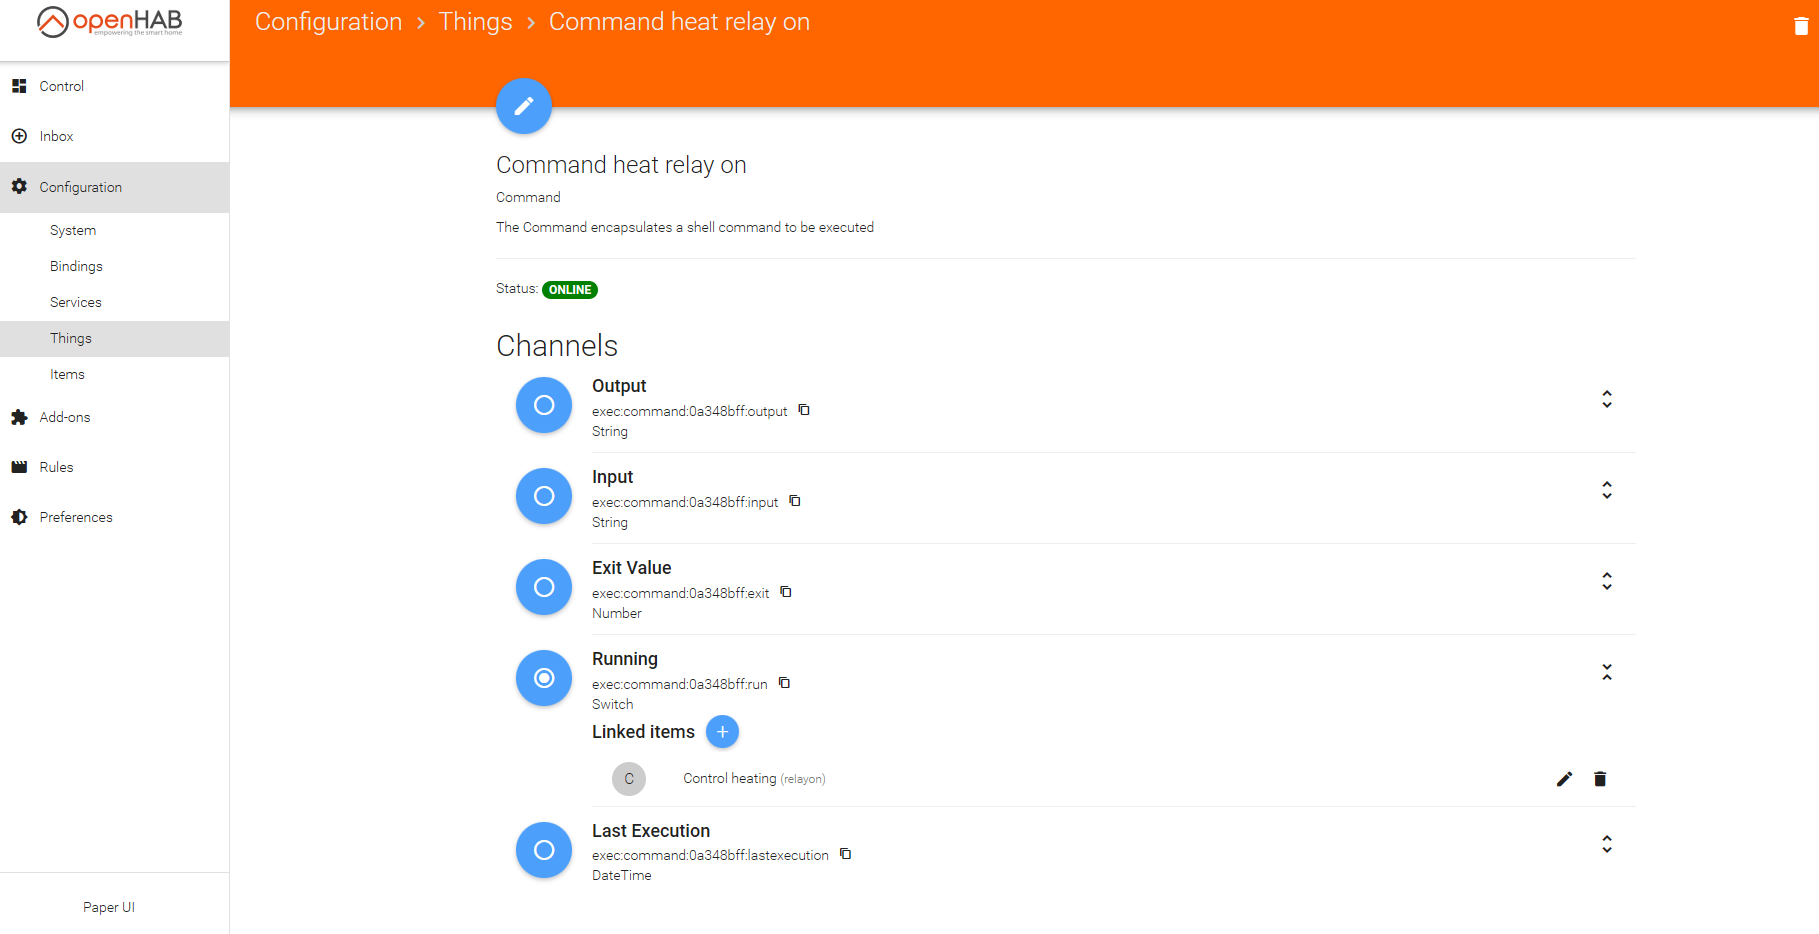
In openhab paper I am using command to call the bash script for pin 12 on and pin 12 off

this is linked with a item I created control heat relay on and another one for off

Next was rule I created a trigger based off the heating pin state

and then send a command to the relay item I created relay on to on relay off to off

The same type of rule is created for heating pin = off to change the state of the relays to send the comand to launch exec script to pin12_off

I repeated this same process for pin 18

I am also using a bme680 sensor instead of the bme 280 to utilize the air quality portion of the chip . To do this I rewrote ( with the help of ai) the bme280.py file

to utilize this you must install adafruit bme680 libary and the paho-mqtt to get airquality to openhab along with items to store air quality in openhab

#!/usr/bin/env python3
import time
import requests
import board
import busio
import adafruit_bme680
import paho.mqtt.client as mqtt

----------------------------

OpenHAB REST API settings

----------------------------

OH_HOST = “http://localhost:8080
#ITEM_TEMP_C = “MyTemp”
ITEM_TEMP_F = “MyTemp”
ITEM_HUMI = “MyHumi”
ITEM_PRESS = “MyPressure”
ITEM_AIR_QUALITY = “MyAirQuality”
ITEM_AIR_QUALITY_CAT = “MyAirQualityCategory”

----------------------------

MQTT settings

----------------------------

MQTT_BROKER = “localhost”
MQTT_PORT = 1883
TOPIC_IAQ = “hestia/local/iaq”
TOPIC_IAQ_CAT = “hestia/local/iaq_category”

----------------------------

Initialize I2C and BME680

----------------------------

i2c = busio.I2C(board.SCL, board.SDA)
sensor = adafruit_bme680.Adafruit_BME680_I2C(i2c, address=0x76)

Optional sensor settings

sensor.sea_level_pressure = 1013.25
sensor.temperature_oversample = 8
sensor.humidity_oversample = 2
sensor.pressure_oversample = 4
sensor.gas_oversample = 1
sensor.set_gas_heater_temperature = 320 # °C
sensor.set_gas_heater_duration = 150 # ms
sensor.gas_heater_profile = 0

----------------------------

Helper function to update OpenHAB item

----------------------------

def update_item(item, value):
url = f"{OH_HOST}/rest/items/{item}/state"
headers = {“Content-Type”: “text/plain”}
try:
response = requests.put(url, data=str(value), headers=headers)
if response.status_code in [200, 202]:
print(f"Updated {item}: {value}“)
else:
print(f"Failed to update {item}: {response.status_code} {response.text}”)
except Exception as e:
print(f"Error updating {item}: {e}")

def readIAQ():
“”“Compute IAQ index 0-500 from gas resistance”“”
gas = sensor.gas
if gas is None:
return 0
GAS_MIN = 5000.0
GAS_MAX = 500000.0
gas = max(GAS_MIN, min(GAS_MAX, gas))
iaq = int((gas - GAS_MIN) / (GAS_MAX - GAS_MIN) * 500)
return iaq

def readIAQCategory(iaq):
“”“Return EPA-style IAQ category”“”
if iaq <= 50:
return “Good”
elif iaq <= 100:
return “Moderate”
elif iaq <= 150:
return “Unhealthy for Sensitive Groups”
elif iaq <= 200:
return “Unhealthy”
elif iaq <= 300:
return “Very Unhealthy”
else:
return “Hazardous”

----------------------------

Initialize MQTT client

----------------------------

mqtt_client = mqtt.Client()
mqtt_client.connect(MQTT_BROKER, MQTT_PORT, 60)

----------------------------

Main loop: read sensor and push values

----------------------------

while True:
temp_c = round(sensor.temperature, 1)
temp_f = round((temp_c * 9 / 5) + 32, 1)
humidity = round(sensor.humidity, 1)
pressure = round(sensor.pressure*0.029529980,2)

iaq = readIAQ()
iaq_category = readIAQCategory(iaq)

print(f"Temp C: {temp_c}, Temp F: {temp_f}, Humidity: {humidity}, Pressure: {pressure}, IAQ: {iaq} ({iaq_category})")

# Update OpenHAB items
# update_item(ITEM_TEMP_C, temp_c)
update_item(ITEM_TEMP_F, temp_f)
update_item(ITEM_HUMI, humidity)
update_item(ITEM_PRESS, pressure)
update_item(ITEM_AIR_QUALITY, iaq)
update_item(ITEM_AIR_QUALITY_CAT, iaq_category)

# Publish to MQTT
mqtt_client.publish(TOPIC_IAQ, iaq)
mqtt_client.publish(TOPIC_IAQ_CAT, iaq_category)

time.sleep(10)  # adjust the interval as needed

After getting script running I changed default.sitemap in /etc/openhab2/sitemaps and added

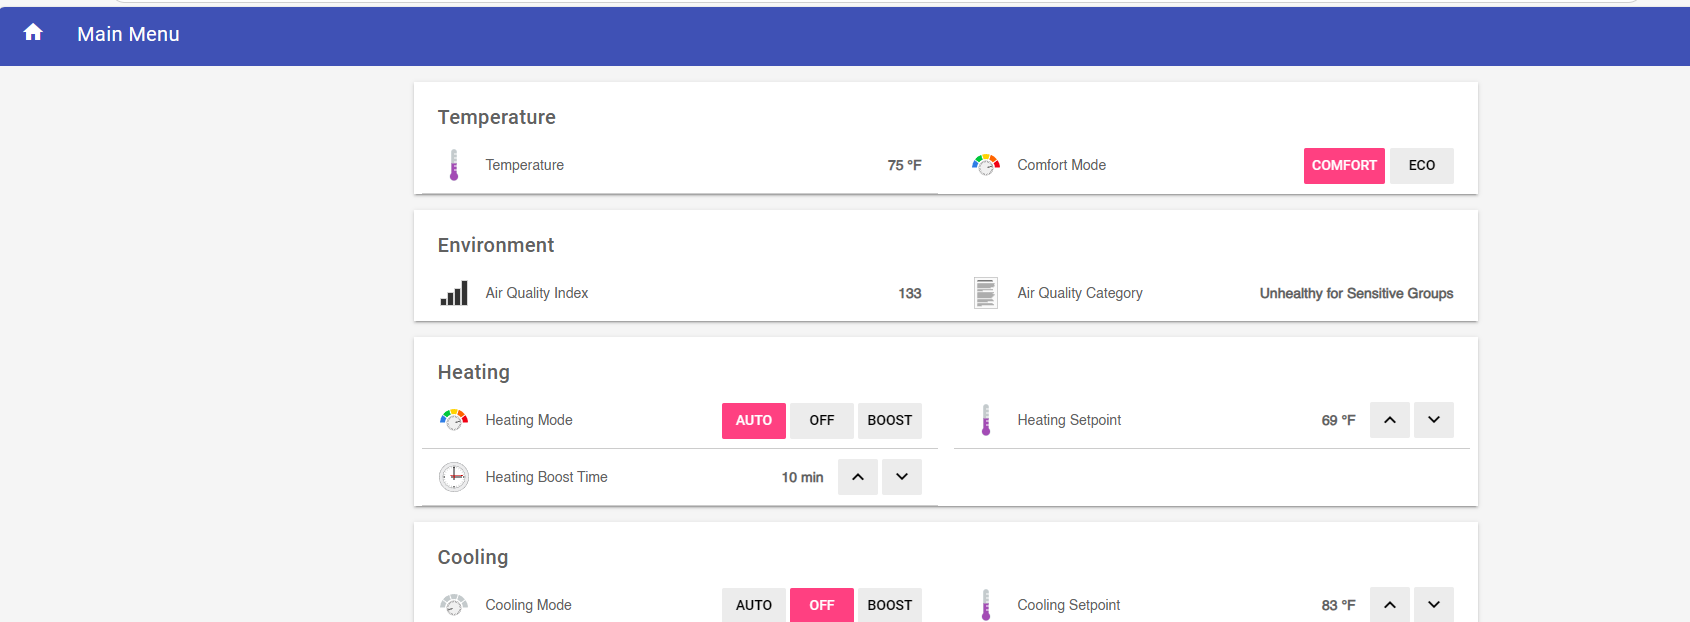
Frame label=“Environment” {
// Text item=MyPressure label =“Pressure [%s]”
Text item=MyAirQuality label=“Air Quality Index [%d]”
Text item=MyAirQualityCategory label=“Air Quality Category [%s]”

to get

}

I am positive that this is not the cleanest way to get up and running but I am seeing relays respond and airquality,temp and humidity change .

Still working on jsnode and how to display on screen . I was able to add IAQ to info page with number replacing where disk space was but thats it

Please share photo of your hardware. Im not sure I understand the relay wiring to the Pi

FyI the relays are sinking

pi 3 - What does setting output high or low mean in RPi.GPIO - Raspberry Pi Stack Exchange

Setting an output pin HIGH outputs ~3.3V; LOW ~0V.

Both have limited current sourcing/sinking capability ~16mA.

What happens (and what current flows) depends on the external connections.

In general current potentially will flow out of a HIGH pin and into a LOW pin.


Incidentally, the way you have wired 3.3V — resistor — LED — GPIO is the way most engineers would connect the circuit.
This requires the GPIO to be LOW to turn the LED ON.
This seems to confuse many beginners.

Thanks everyone for the resistor size, confirming that gpiod works, 1 is typically on and 0 is off, and all the other things from this thread.

Shell script needed

Here are my notes on what I looked at before I become convinced that a shell script will be needed the GPIO can not be controlled via /sys. I’m showing my work so others can correct me if I’m wrong.

Rules → Heating Control: Can see that it turns HeatingPin to ON or OFF.

Configuration → Items → Heating Pin: This is the item being controlled

Rules → Map a device to gpio pin: This is the rule that sends the new state to the pin (and the mapping is done in defaults.js). In the case of system in US mode and turning on the heat, that’d be going to Pin12.

/etc/openhab2/items/default.items: creates the Pin12 item and maps it to `gpio=”pin:12” (and it also creates the other 3 PinXX to GPIO mappings).

As best I can tell, at the end of the day, it’s the GPIO binding that is doing the actual turning on/off of the GPIO pin, and the documentation makes it clear that this requires /sys which is no longer around. I do acknowledge that in OpenHAB 5 (the current version at the time of writing), the GPIO binding has been updated to use pigpiod which based on the name is pretty clear it will use gpiod instead of /sys. However starting at v3, OpenHAB started requiring a newer version of Java, which requires a hardware floating point unit and the Pi Zero W doesn’t have that.

So that’s why I think we need a script if this image is going to work with the original hardware.

Experimental solution

To be honest, I still don’t understand how all these thing/channels/items/rules/commands all fit together in OpenHAB, even after reading the overview several times. But I was able to follow along the path of @cheeseyone1 with some slight modifications. I will list out the changes I made and then link to the repo where you can check out the config files.

  1. I created the same shell scripts, but I put them in ~pi/scripts/.
  2. Add an Item called Pin12on (type=Switch) which will activate the thing
  3. Add a “Command heat relay on” Thing (type=Exec) that will run the script
  4. Edit the Thing and clicked on the blue circle next to the “Running” channel and selected Pin12on as the item to link. This causes the script to run when a command is sent to pin12on.
  5. Repeat steps 2-4 with Pin12off
  6. Repeat steps 2-5 with Pin16on and Pin16off for second stage heating
  7. Edit the JS in “then…” clause of the “Heating Control” rule to command these pins when needed (details below)
  8. For EU mode, repeat steps 2-5 with Pin23on and Pin23 off for your heating to work.

The changes to the “then…” clause of the “Heating Control” are to load defaults.js and then look up the correct pin for your heat and so an events.sendCommand(pinItem + "on", ON); to turn whatever relay controls your heat on (it’s not the same for the US and EU modes).

If you’ve been making these changes along at home, at this point the heating should be functional (including 2nd stage heating if that’s enabled).

Getting the new rules

If you are running the test image, you can get the new rules by checking out my fork of the repo

git clone https://github.com/hestiahacker/hestia-touch-openhab.git
cd hestia-touch-openhab
sudo rsync -av ./var /var
sudo rsync -av ./etc /etc
sudo rsync -av ./home /home

Do note that I haven’t tested restoring these files, and I haven’t tested things out in EU mode yet. But I did test out Heating, 2nd stage heat, fan and cooling. If the files can be moved from my checkout to other machines, and I didn’t miss anything, you should be able to reproduce this.

I think I missed a step .I modified Default items to pull up script based on on of condition of pin

// var logger = Java.type(“org.slf4j.LoggerFactory”).getLogger(“org.eclipse.smarthome.model.script.rules.backup”);
//
// var ExecUtil = Java.type(“org.eclipse.smarthome.io.net.exec.ExecUtil”);
// var r1 = ExecUtil.executeCommandLineAndWaitResponse(“echo ‘wait for result’”, 5000);
//
// var ScriptExecution = Java.type(“org.eclipse.smarthome.model.script.actions.ScriptExecution”);
// var DateTime = Java.type(“org.joda.time.DateTime”);
// var runme1 = function(){ logInfo(“Native Quartz Timer completed”); }
// var timer1 = ScriptExecution.createTimer( DateTime.now().plusSeconds(5), runme1);
//
//var OPENHAB_CONF = Java.type(‘java.lang.System’).getenv(‘OPENHAB_CONF’);
//load(OPENHAB_CONF + ‘/automation/lib/hestia/utils.js’);
//load(OPENHAB_CONF + ‘/automation/lib/hestia/defaults.js’);
//Switch Pin12 { gpio=“pin:12” }
//Switch Pin16 { gpio=“pin:16” }
//Switch Pin18 { gpio=“pin:18” }
//Switch Pin23 { gpio=“pin:23” }

Switch Pin12 “Pin12” { exec=“>[ON:/bin/bash /usr/local/bin/pin12_on.sh] >[OFF:/bin/bash /usr/local/bin/pin12_off.sh]” }
Switch Pin16 “Pin16” { exec=“>[ON:/bin/bash /usr/local/bin/pin16_on.sh] >[OFF:/bin/bash /usr/local/bin/pin16_off.sh]” }
Switch Pin18 “Pin18” { exec=“>[ON:/bin/bash /usr/local/bin/pin18_on.sh] >[OFF:/bin/bash /usr/local/bin/pin18_off.sh]” }
Switch Pin23 “Pin23” { exec=“>[ON:/bin/bash /usr/local/bin/pin23_on.sh] >[OFF:/bin/bash /usr/local/bin/pin23_off.sh]” }

Has anyone had a chance to check out modifications and confirm that they work? I want to make sure I didn’t miss committing any files, or commit something that is not portable to other HestiaPi devices. Instructions on how to get them for testing are here.

I haven’t been able to make the image run properly. Even with the steps you provided, relays do not get triggered (at all). UI (LCD + Web) gets updated but relays dont.

OK, my previous instructions on how to get the latest rules were rubbish. Not just because I forgot to commit some files, or because I forget to include the command to check out the correct branch, but also because there are a bunch of steps that need to be done to get the correct permissions on all these files. Here’s an updated version that should work properly if run from the pi with the existing Debian 12 image.

curl https://raw.githubusercontent.com/hestiahacker/hestia-touch-openhab/refs/heads/ONE-bookworm/home/pi/scripts/updateone.sh > ~/scripts/updateone.sh
chmod +x ~/scripts/updateone.sh
~/scripts/updateone.sh # this will reboot your HestiaPi

This worked for me when I tested it.

Here’s a fresh image that triggers the relays properly: 2.92 GB file on MEGA

1 Like

Will test in the following days! Thank you so much!

Which Pi are you testing on?

I get this from a simple top:

top - 13:22:43 up 1:20, 2 users, load average: 2.16, 2.08, 1.96

and with a little bit of playing with the web UI triggering the relays I get to:

top - 13:31:17 up 1:28, 2 users, load average: 4.52, 3.91, 2.80

btw the LCD touch calibration is off so it is not usable by me. Haven’t tried running the calibration utility yet.

Have you left the rules untouched? Pushing it by triggering heat and cool while also adjusting the setpoints I managed to have all 3 relays activated (heat, cool and fan).

I’ve tested with both the Pi Zero and the Zero 2.

I didn’t look at the load averages, but the UI was responsive and the relays kicked on as expected.

Is the screen calibration issue the same one you had previously? Has anyone else been able to reproduce that issue? Does it happen with a new screen of the exact same make and model, or is it just that one device that’s having calibration issues?

I did have to make some changes to the rules to accommodate the inability to control GPIO via /sys. I don’t think I removed any existing lines of code, but I supplemented the code required to turn the relays on/off on the new version of Debian. The old code won’t work on the new O/S but it’s needed if for the old, and the new code won’t do anything on the old O/Ses but is needed for the new. (Note: I didn’t try testing the new rules on the v1.4-dev image. I figured we could test that after we know the basics work in v1.5).

Here are the differences:

I manually decoded the first change and confirmed it’s just adding code that run events.sendCommand() to turn the relays on and off.

How did you trigger the heating and cooling at the same time? Were you able to adjust the setpoints so they crossed, or were you turning on the heat and then boosting the cooling, or was it something else? I’d like to try to replicate this issue. I’ll also play around with the unit I have on my bench that’s hooked up to LEDs so I can confirm when the relays are really on or off.

Similar but not the same because running the xinput calibration tool does not fix it entirely. Touch works on the left-bottom side but not the top where is all the controls. Also there is a cursor shown (not hidden).

Adjusting setpoints and activating heating and cooling without waiting for the UI to finish. More like stress testing it. I don’t think it is something you should look into yet as it may be happening because of the high load…

My main question for this thread is whether we should pile on additional features to the v1.5-dev image that went into testing last September. It’s mainly aimed at @HestiaPi since they are the one who decide if/when merge requests get approved to be in the official repositories, but if anyone else who is helping with testing wants to weigh in, I’d be interested to hear your thoughts.

My opinion: we should lump them in to minimize the amount of re-testing. None of us have a lot of time to test things and since we’ve had reports of fundamental things breaking, I think this calls for a full retest of absolutely everything instead of just what’s changed. If we’re going to re-test everything, we might as well just do it once for as many changes as we can get in there.

Heating & Cooling at the same time

First, I was able to reproduce the issue with heating and cooling being on at the same time in the v1.4 image (and this likely applies all the way back to 1.0 and all versions in between). Here’s how it’s done:

  1. Start in US mode with heating and cooling off
  2. Adjust the setpoints so when heating is set to auto, it will turn on the heat
  3. Set heating to auto, then, before it actually activates the heat, press boost on the cooling
  4. Observe that after a few seconds both heating and cooling are active

This is not merely a display issue, but it actually does activate the relays as well. This can be triggered from the LCD UI, or the web-based UI. It is unrelated to the load averages being high. And finally, it can probably also be triggered without boosting, by activating the heat and then mashing the set points fast enough to cause the cooling to be activated at the same time. I didn’t

Root cause analysis: I believe the root cause of this is because of the delay when the heat kicks on. Instead of activating it immediately, it activates it after a 10 second delay. I don’t know why it does has this delay, but I digress. When the cooling is triggered by the boost command, it looks at the actual state of the heating, accurately concludes that the heat is off and proceeds to activate the cooling (again, on a delay). After each of the delays, the heating and cooling are activated, in that order.

Proposed fix: Have the heating and cooling turn on immediately instead of putting in a delay. The delay for turning off the fan 10 seconds after the heating/cooling is turned off makes sense to me. It’s basically doing what it can to push the residual heat/cool from the radiator into the house. I do not understand the purpose of the delay before turning thing ON.

My opinions on the severity: This bug should be fixed, but I only consider it to be a minor issue due it never happening under normal operations. The only way this is going to happen is if someone is stress testing the thermostat. While it’s possible that someone might turn heating to auto and boost the cooling withing a few seconds, they are not going to do so when the room temperature is below the heating set point.

Heat pump support

I added support for a Heat Pumps mode on the unit I had on the bench and have that working! I was building upon the bookworm (Debian 12) based image (v1.5-dev) and the changes primarily involved updating a bunch of the OpenHAB rules, but also changing some files such as the sitemap, the oneui, the Items file and various other things.

I was expecting the HVAC addition to be a separate release from v1.5-dev, but since we usually only get a round of testing in per year, I’m now wondering if I should bundle it all together for consideration?

I ran that same testing procedure on my local image that supports the heat pump and it didn’t turn the heat on at the same time as the cooling. The way it behaved was it turned on the heat immediately, and when the boost for the cooling came in, it turned off the heat (first and 2nd stage) and then turned on the cooling for 10 minutes. After 10 minutes, the heat turned back on due to the temperature being below the set point.

Now, heat pumps literally can’t do heating and cooling at the same time by design, but I switched modes to “HVAC” and re-ran the test and it also passed the test there. It did behave a little differently in that a split second after I hit boost, the cooling was set back to “off”. So it basically, it wouldn’t let me boost the cooling if the heating should have been active, which seems like a fine way to handle this situation.

I would vote for one testing batch for everything. It would also make sense to agree in advance on the features to be implemented beforehand as it would reduce development time too.

Regarding “approval“… this is an open community so we discus openly any concerns that may arise. The testing indeed is a pain as not many members are involved. Potential differences in the hardware are also something to take into account.

With the addition of Hestia32 (expect a public alpha release next month) this is only going to get more complicated.

I would suggest to announce a new future release and throw in all the feature requests and/or bugs into it to vote what to include and what to leave out for the next release. Then we can work on something we have all agreed on.

That seems reasonable. I didn’t mean any offense with my comment about merging & cutting releases. It’s just that I know you’re busy and I want to be sure I’m doing my part to put things into a branch (or not) in a way that will make it as easy for you to review them as possible.

Because I’m making so many drastic changes to the rules on account of the addition of heat pump support, I’ve been doing a huge amount of testing. This has exposed some additional issues that have been around since at least 1.2-dev. I’m just hitting lots of edge cases that were never tested before. I’m also confirming the relays are actually activating when the display says they are.

Here are the issues I’d like to get into the v1.5 release:

  • Upgrade to Debian 12 ticket
  • Ensure heating & cooling can’t run concurrently ticket
  • Fix multiple issues with stage2 heating ticket
  • Add support for heat pumps ticket
  • (possibly) Persist comfort ranges (already done) ticket
  • (possibly) Add boost for fan ticket

And the issues I’d like to address with the next hardware revision:

  • Ability to reset the thermostat when using the Pi Zero 2 ticket
  • Solve the problem of the LCD pins being difficult to align ticket
  • Add a 5th relay to support 3 stage heating with heat pumps ticket

All of the ones that aren’t marked as “possibly” are already done and tested locally. I committed the changes to my git repo and am building a new image now to verify I got everything into git which is needed.

In any case, I can assure everyone that the v1.5-dev release will be the best tested release since I’ve gotten involved in the project. I’ve already spent more time testing this one than I have on any previous image. Now that I’m set up with a hardware test rig, and I can afford to dedicate some full weekends and evenings to this project, I plan on continuing this pattern of extensive testing.

With the combination of a new hardware revision for the ONE, a new software release for the ONE, and the Hestia32 all seeming to wrap up at the same time, I feel like we could really get some momentum going and hopefully gain more people to help with development and testing.

1 Like

I read again my reply and it may come across wrong… No offense taken :slight_smile: I was mostly trying to explain to new people how this project works.

Your list and Github issues is the best way to show, describe, track and plan what each release will bring along. Try and keep it updated.

Regarding testing. As I’ve seen from Hestia32 project, it is best to have a go-to list for all the tests that you can tick off. Ideally add it in the repo for people to use and contribute.

Looking fwd to the new release…

I’m nearly there with the heat pump features and will be moving on to adding support to boost the fan next. That is the last change I expect to make apart from things that might come up in final testing. If anyone wants a preview of the heat pump work, here’s the image.

But don’t bother spending a lot of time doing serious testing because when I add the fan boost feature, it’s going to require doing the testing all over again, as those changes could introduce new problems. So unless you want to see the heat pump in action, you might as well wait test everything all at once.

Update: I’ve decided that the user should be able to boost to the fan while it’s on AUTO (the fan is active because the heating/cooling is active). The expected behavior is that the fan will stay on for the duration of the boost and then return to it’s previous state after that: either ON or AUTO (and AUTO is basically OFF except if the heat/cooling is activate).

I’ve also been testing out various combinations like: Fan OFF → Fan Boost → Heat on (and active; which causes the fan goes into AUTO mode) → Heat off (should cause fan should return to Boost mode). That one in particular doesn’t work as expected right now, it goes back to OFF, so I’m working on that.

I’m also thinking about the simplest way to describe what the expected behavior should be. I think the two general rules are 1.) it will obey the most recent command if there’s ambiguity, and 2.) Boost will guarantee that function will stay active for the duration.

For example, if someone turns on the Fan, then boosts the fan (even though it’s already on), the expectation is that they want the fan to be turned off at the end of the boost. This would be an example of obeying the most recent command in the event it is ambiguous. The most likely way that would happen in practice is if the person pressing boost isn’t the same as the person who turned the fan on, and they didn’t realize it was already on. That’d lead to the two people having different expectations on what should happen, and we’re going to respect the most recent one (whether it was the same user or not, since we can’t tell).

The extra testing should make sure that this Fan Boost feature is implemented in the most easy to understand fashion so it behaves as people expect (or people know what to expect) in complicated situations.

After extensive testing, I believe everything is working except for one existing bug that was never previously discovered/reported.

I’ve opened a bug report on this, and given the the amount of work involved in fixing that bug, I propose we leave this bug out of the v1.5-dev release and tackle it later.

With that disclaimer in place, I think we’re ready for what I hope will be final testing of v1.5-dev! Image link below: