I just set my brand new HestiaPi in the living room, looks great!
One thing I would like to tweak is brightness. It is lightening all the corridor!
Do you know a way to adjust the LCD backlight?
I just set my brand new HestiaPi in the living room, looks great!
One thing I would like to tweak is brightness. It is lightening all the corridor!
Do you know a way to adjust the LCD backlight?
I’m afraid the LCD does not support that. The power used for the backlight is shared with the electronics so you cannot cut or limit it without breaking communication with the Pi.
A hack I found but requires a bit of electronics is here:
It adjusts the brightness according to ambient light of the room, which is probably exactly what you are after.
What about doing it in software? Rather than sending a backlight dim command to the display you could manipulate the image itself that you send to the LCD using a command line tool like xrandr.
xrandr --brightness .8
I haven’t tested it myself but can try it out next time I have a free afternoon, unless someone else wants to give it a shot first.
As the actual light of the backlight is not accessible from software the most you can do is make the image shown more black which is what you are suggesting. I don’t think this will affect much as the UI is already black enough.
As a quick test you could make a completely black html page in the ~/scripts folder and load this instead of the UI.
If this is OK for you you can enable the screensaver like so:
sudo nano /etc/lightdm/lightdm.conf
find and modify the xserver-command line under [Seat:*] to this:
xserver-command=X -nocursor
Cannot remember where you set the timeout. I don’t have access on a HestiaPi instance from where I am now but this should be a google search away.
I get this:
pi@raspberrypi:~ $ xrandr --brightness .8
xrandr: --brightness must be used after --output
Try 'xrandr --help' for more information.
Now i just tested it in vbox and not on my Pi but to get the xrandr command to work, try the following and let me know if it works:
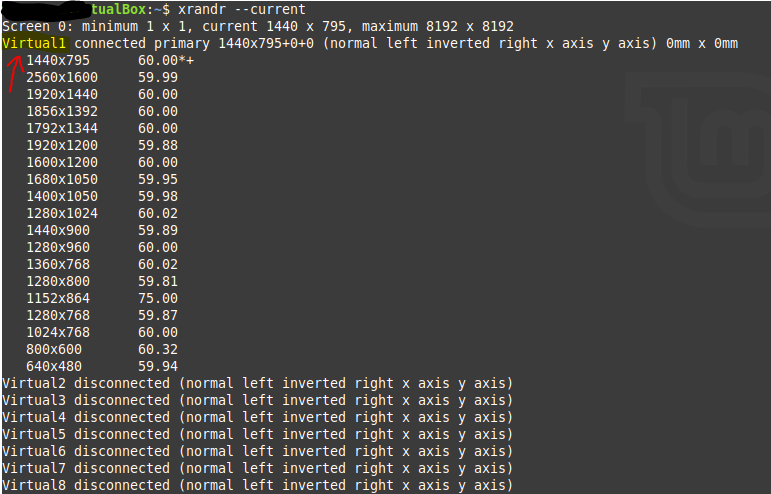
xrandr --current
should output something like so:
Where I have highlighted, you will want to use that as the output. So in my case, it would be:
xrandr --output Virtual1 --brightness .8
I trued that command and get “Can’t open display” as a result.
I don’t have the info handy right now, but this is something we tried very hard before giving up due to the limitation of the hardware. More expensive LCDs can do the trick much easier as they simply timeout from the OS like a screensaver.
pi@raspberrypi:~ $ DISPLAY=:0 xrandr --current
xrandr: Failed to get size of gamma for output default
Screen 0: minimum 480 x 320, current 480 x 320, maximum 480 x 320
default connected 480x320+0+0 0mm x 0mm
   480x320        0.00*
pi@raspberrypi:~ $ DISPLAY=:0 xrandr --output default --brightness .8
xrandr: Gamma size is 0.
Could you recommend one that is dimmable, i’d like to upgrade. 
The cheapest option we have found are HDMI ones that are dimmable but you are talking about 50-60EUR just for the LCD and the HDMI connection bracket or cable will make physical positioning more challenging or simply bulkier.
This is totally out there and definitely not something that would be as cheap as what ships with the HestiaPi now, but did you spend any time looking at eInk displays?
@rlkoshak i thought about that too, but the late nite visibility was a deal breaker. I’m experimenting with this then imma report back. it looks like the link below but i found a cheaper knockoff.
This OLED is tiny for the LCD UI and it has no touch functionality. It is dimmable though.
For those not familiar with OLED displays, it will not be a plug-and-play thing to replace the existing LCD with the UI with this…
My thinking is that Ill use the joystick to cycle between screens. Imma write the UI myself then show y’all a use case.
All the communication between the LCD UI and the backend is through MQTT messages so it will be easy to get and set all the needed values/settings. Looking forward to that…
Mos def, I’ll make a little stub for ya’ll. I’m writing it in golang.
@HestiaPi looking good on attaching the OLED. Am I going to mess anything up if i remove and replace the hardware that attaches the RPI zero to the hestia pi PCB? I need to put standoffs in their place.
Could you send a picture? The “ONE” model doesn’t have anything in between. They are soldered together and unsoldering with a classic soldering iron is a pain (if not impossible)
@HestiaPi Oh sure, I just need to remove these screws and replace them with something smaller so I can install the standoffs to mount the OLED hat. I’m referring to the screws/bolt and nut on each side of the GPIO pins and that bottom far corner. I tested it out last night and this is definitely going to work.
It’s just the mounting I have to get right. If the RPI zero is soldered to that pcb, it sounds like i should be fine as long as i just put the new hardware through the mounting holes and don’t jostle the RPI.