Is it possible to build a thermostat using the HestaPi image, an already owned Raspberry Pi, sensors and a touch screen? I like the open source idea, and understand the need to fund the project, but I’m looking to build something “from scratch”, except for the code. Thanks.
If you have a touch screen, BME280 temperature/humidity sensor, and a relays, it shouldn’t be too hard to get it working.
Look at https://hestiapi.com/product/hestiapi-touch-complete-circuit/ for the actual contents of the HestiaPi Touch.
1 Like
Second that  Thanks @Jaap
We strongly support people making HestiaPi themselves but may I ask why you want to start from scratch and not at least manufacture the available PCB design?
Is it a custom feature you have in mind or simply for the fun of making?
I am only asking in case it is something other people are interested so we can include it in a future release.
Maybe I hadn’t explored what the “kit” is enough before I posted. My first impression was, the price is higher than I wanted to pay for something that is not a commercial product (yes, I’m cheap). My immediate second thought is that I have a Pi already and could probably build it myself. In the 10 minutes I spent on the website, I couldn’t find what I felt was a clear parts list and documentation that lent itself to be a project open to the point of “download the OS, and build the rest yourself” - as in I did not get the impression that the kit is available only for the needs of people who are beginner DIYers, and so assumed the only way to “build” this is to buy all the hardware from HestaPi. I’ll spend more time on the site - if what you are saying that I can download & manufacture the PCB, plus acquire sensors and the Pi on my own, then that is basically what I was looking for. I’ve been reading many blog posts of people making their own smart thermostats using a Pi, but they are for the most part projects that had been abandoned for several years. This community-backed project is more what I was hoping for - the OS and/or code being developed and maintained by a community, but the hardware is available to purchase as kit for those who need it, but can be assembled from other sources for those who can.
The tabs on top of downloads page are indeed a bit “hidden”.
You are the second to say that so we need to add a bit of time on website review in our looong to do list 
Sorry for the trouble.
The price is indeed high if you only compare parts cost for 1 item. If you run a company though and this is for larger quantities, then new numbers (and time wasted on non-manufacturing/designing tasks) keep poping up rising the price we can sell it assembled. That’s why we strongly support people making HestiaPi themselves. Donations are always welcome though
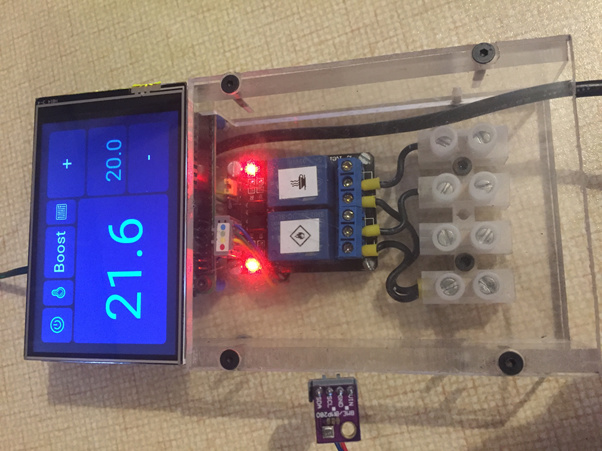
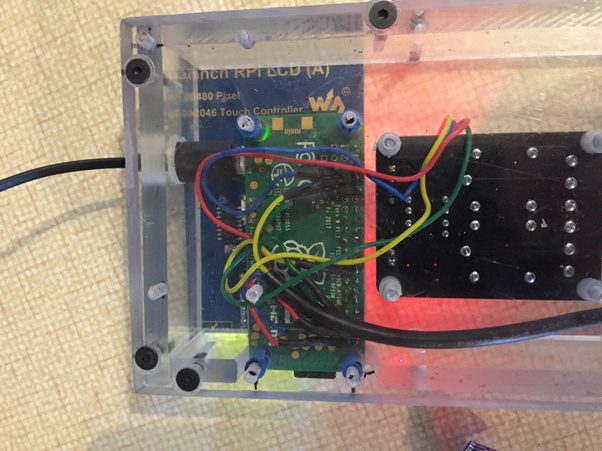
We first made a HestiaPi Classic out of bits bought on eBay and we’re really proud and happy with it. It is currently fitted to our central heating system and is keeping us warm exactly when we want. It was primarily a making project to teach kids about electronics, soldering, programming,…
We’re now working on our v2.0 which is a Raspberry Pi Zero W, again touchscreen, sensor and relay board bought cheap on eBay.
We’re not quite there yet but getting close and eventually it will be replacing the Classic version in the cupboard.
To sum up, yes, it can definately be made completely from DIY bits and pieces from the internet shops (eBay, Amazon,…) without manufacturing the pcb, Just read the pcb drawings and replicate the pcb tracks with wires.
This is our prototype so far
2 Likes
Are the tabs better now?
Thank you all for the great feedback and info. I’m getting ready to start my own HestaPi build. This active community definitely has convinced me that this project is the way to go. May I ask one more question (at least for now)? Any recommendations on where to get the PCB printed? That’s something I’ve not done before. I’d like it to all fit nicely in the already designed case, so I’m not going to breadboard it. If anyone can suggest a reliable/inexpensive site for getting the board printed I’d really appreciate it. Thanks again.
That is one option out of many
http://www.allpcb.com
Local shops may be available in your area.
Hello,
I am also interested in the DIY option and some related questions:
- I have a Raspberry PI 2. Can I use this to build a HestiaPi Touch? If not, what about the Zero W?
- I am aware of the PCB design available on the downloads section, unfortunately I don’t have the knowledge required to deduce from it what other components I would need. So as mentioned before there is the touch display and the sensor. What relay module would I need? What about to convert 220v mains power to 5v usb power?
- Are there other viable case design than the one available (the one on the blog from earlier this year)? A rectangular one would work better from me.
Thanks!
The different physical dimensions of Pi 2 will make your work much harder. I would avoid it.
Zero W is absolutely fine. Tested and approved ![]()
If you click on the PCB there is a BOM list
The recommended power supply is this.
There are two more PCBs under development but are not ready yet I am afraid as they are not tested thoroughly for faults.
Thanks for that, how could I miss it.
Another interest on using the Pi 2 is the usbs. I have this idea for the thermostat to be the overall controller and the expansion possibilities of the usb come in handy to add extra radio modules (thinking on zwave usb and/or CUL usb). Checking the overall design, the relays and power supply will collide with the ethernet/usb area of the pi 2, or otherwise the block would need to be much thicker, probably not fitting the case (not that the usbs would anyway, the cul is big).
Then I would use a small USB hub like this

to incorporate on the RasPi Zero the extra functionality you mention. I believe the hub and the linked cul device would still fit in the Hex case.
Another approach would be to plug the Pi2 under the PCB which would again increase the size a lot (not to mention my major worries on the thermal design) but this involves either special components (dual side pin connectors on the PCB) or advanced soldering skills.
Hello!
I was involved in building my own smart thermostat using a Spark (now Particle) board, then I found this community.
I would like to build the HestiaPi Touch by myself, but can’t find a complete bill of materials. There is a partial one for component to be placed on board, but no reference for WiFi adapter (“zero w” has its own, right?) nor LCD display. Even the power module is suggested on this thread, but you have to look for it.
I will be happy to share a gdocs sheet with a complete BOM, if I can. People interested will be able to add/modify the list.
Thanks for your help.
You are absolutely right. At the time of printing some components (like the ones you mention) were still under consideration so we didn’t include them in the list. Since then, we forgot
Please bear with us till we update the BOM within the next hours. We will post right here and its done.
We don’t agree about the gdoc only because it is spreading the info across many places making it very hard for new people to find all that is needed.
Thank you for drawing our attention. It is something we should have taken care some time ago but HestiaPi has become a fairly demanding project with almost no help back from the community and not being a financially sustainable one leaves us less time on it.
In the interests of both allowing the community to help and keeping info in one place, it’s worth noting that moderators can create wiki posts that any logged-in user can edit. This may be useful for crowdsourcing things like this before making the info official somewhere.
It is official now so we are happy to publish them ![]()
But your suggestion will be needed if it happens again and we don’t have an answer straight away.
I think I can wait some hours ![]()
Indeed. Also existing posts can be converted to a wiki, so if something useful is already written up by a community member that work doesn’t have to be repeated.