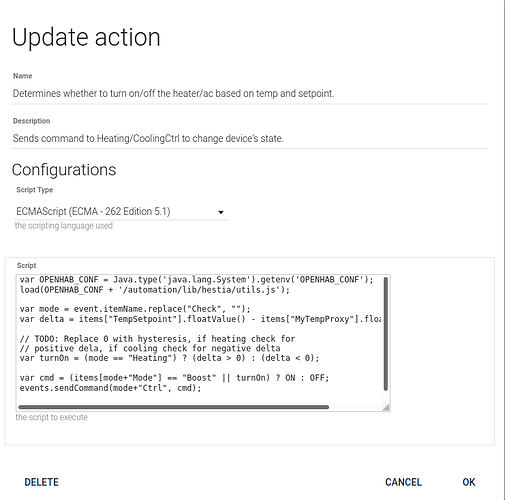
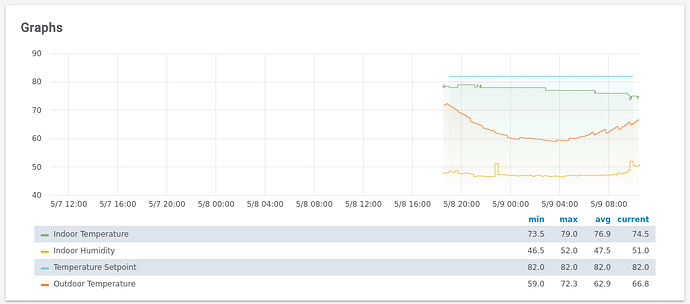
Coming soon there will be a radical change to the HestiaPi configs. Instead of the big and long .rules file, all of the Rules have been moved so they can be see and edited from PaperUI directly (and this will reduce the boot time to around ten minutes).
This tutorial is a first draft showing a way you can do this without breaking the stock set of Rules that comes with HestiaPi ONE. For this tutorial we will be adding hysteresis to the Heating rule
Create a Backup
In the Maintenance section of the BasicUI there is a button to trigger a backup of the OH configurations. Trigger a backup now.
Get the REST Documentation add-on
In PaperUI open “Add-ons” and the “USER INTERFACES” tab and install the “REST Documentation”.
This will allow us to more easily duplicate a Rule. (NOTE: Future versions of OH will replace PaperUI which I hope will make this process easier without resorting to the REST API.
Once it’s installed, open the dashboard and you will see a new REST Documentation entry. It can take a few minutes to install a new add-on on the HestiaPi so be patient.
NOTE: as an alternative you can edit the JSONDB files directly but only do so when OH is offline. Given the 10 minute boot time that may not be desireable.
Create a copy of the Rule
NOTE: I’ll write a script to do these steps for you sometime soon.
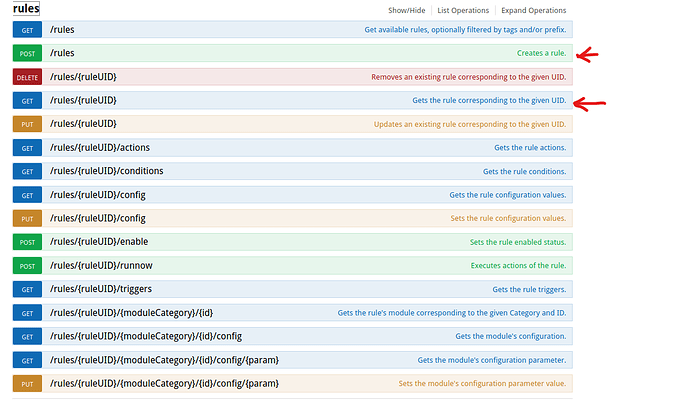
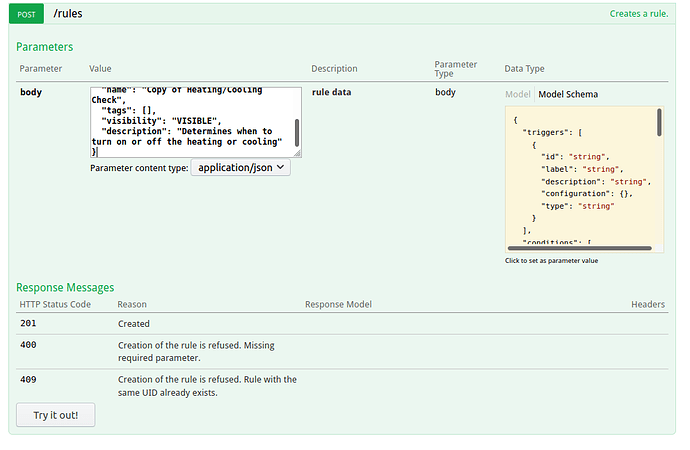
In the REST API Docs go down to the row that says “rules” and open it up. We will be using the GET /rules/{ruleUID} end point and the POST /rules end point.
First we need the UID of the Rule we want to change. Go to the Rules tab in PaperUI and scroll down to the Rule you want to change. In this case we are looking for the Rule “Heating/Cooling Check”. Click the alarm clock icon next to the Rule to disable it.
Under the Rule description there is a long random string of letters and numbers. This is the UID for the Rule. Copy that to the clipboard.
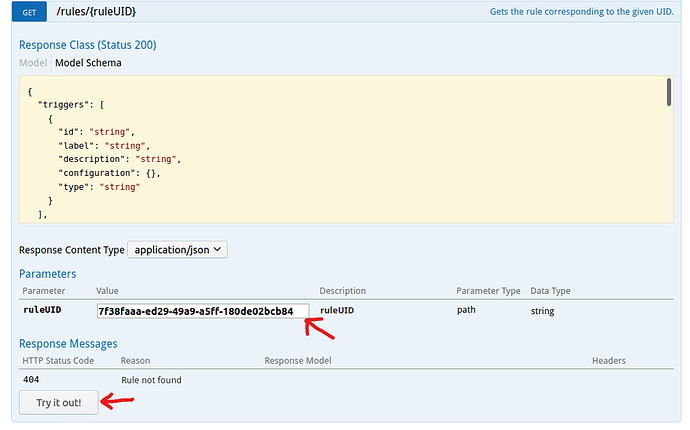
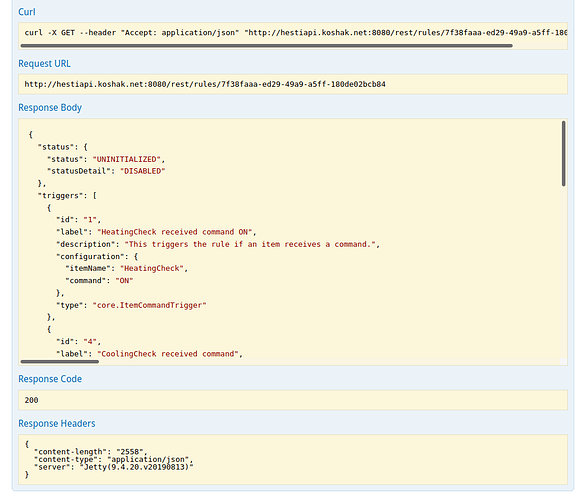
Return to the REST API Docs and open the “GET /rules/{ruleUID}” row and query for the JSON that defines this Rule. Paste in the Rule UID and click “Try it out!”. Make sure you don’t have an extra space at the front or back of the UID.
The JSON in the “Response Body” is the Rule definition.
Copy this and paste it into a text editor.
In this case the JSON is
{
  "status": {
    "status": "UNINITIALIZED",
    "statusDetail": "DISABLED"
  },
  "triggers": [
    {
      "id": "1",
      "label": "HeatingCheck received command ON",
      "description": "This triggers the rule if an item receives a command.",
      "configuration": {
        "itemName": "HeatingCheck",
        "command": "ON"
      },
      "type": "core.ItemCommandTrigger"
    },
    {
      "id": "4",
      "label": "CoolingCheck received command",
      "description": "This triggers the rule if an item receives a command.",
      "configuration": {
        "itemName": "CoolingCheck",
        "command": "ON"
      },
      "type": "core.ItemCommandTrigger"
    }
  ],
  "conditions": [
    {
      "inputs": {},
      "id": "2",
      "label": "TempSetpoint and MyTempProxy are valid",
      "description": "Allows the definition of a condition through a script.",
      "configuration": {
        "type": "application/javascript",
        "script": "var OPENHAB_CONF = Java.type('java.lang.System').getenv('OPENHAB_CONF');\nload(OPENHAB_CONF + '/automation/lib/hestia/utils.js');\n\nvar logName=\"heatcool\";\n\nvar ok = (items[\"TempSetpoint\"] != NULL || items[\"TempSetpoint\"] != UNDEF ||\n          items[\"MyTempProxy\"] != NULL || items[\"MyTempProxy\"] != UNDEF);\n\nif(!ok){\n  logError(logName, \"Cannot determine heating/cooling: TempSetpoint = \" + items[\"TempSetpoint\"] + \" MyTempProxy = \" + items[\"MyTempProxy\"]);\n}\n\n(ok);"
      },
      "type": "script.ScriptCondition"
    }
  ],
  "actions": [
    {
      "inputs": {},
      "id": "3",
      "label": "Determines whether to turn on/off the heater/ac based on temp and setpoint.",
      "description": "Sends command to Heating/CoolingCtrl to change device's state.",
      "configuration": {
        "type": "application/javascript",
        "script": "var OPENHAB_CONF = Java.type('java.lang.System').getenv('OPENHAB_CONF');\nload(OPENHAB_CONF + '/automation/lib/hestia/utils.js');\n\nvar mode = event.itemName.replace(\"Check\", \"\");\nvar delta = items[\"TempSetpoint\"].floatValue() - items[\"MyTempProxy\"].floatValue();\n\n// TODO: Replace 0 with hysteresis, if heating check for \n// positive dela, if cooling check for negative delta\nvar turnOn = (mode == \"Heating\") ? (delta > 0) : (delta < 0);\n\nvar cmd = (items[mode+\"Mode\"] == \"Boost\" || turnOn) ? ON : OFF;\nevents.sendCommand(mode+\"Ctrl\", cmd);\n\nsleep(10); // keep the rule from running again too soon"
      },
      "type": "script.ScriptAction"
    }
  ],
  "configuration": {},
  "configDescriptions": [],
  "uid": "7f38faaa-ed29-49a9-a5ff-180de02bcb84",
  "name": "Heating/Cooling Check",
  "tags": [],
  "visibility": "VISIBLE",
  "description": "Determines when to turn on or off the heating or cooling"
}
Delete the “status” section.
Delete the “uid” at the bottom.
Change the “name” to “Copy of Heating/Cooling Check”.
{
  "triggers": [
    {
      "id": "1",
      "label": "HeatingCheck received command ON",
      "description": "This triggers the rule if an item receives a command.",
      "configuration": {
        "itemName": "HeatingCheck",
        "command": "ON"
      },
      "type": "core.ItemCommandTrigger"
    },
    {
      "id": "4",
      "label": "CoolingCheck received command",
      "description": "This triggers the rule if an item receives a command.",
      "configuration": {
        "itemName": "CoolingCheck",
        "command": "ON"
      },
      "type": "core.ItemCommandTrigger"
    }
  ],
  "conditions": [
    {
      "inputs": {},
      "id": "2",
      "label": "TempSetpoint and MyTempProxy are valid",
      "description": "Allows the definition of a condition through a script.",
      "configuration": {
        "type": "application/javascript",
        "script": "var OPENHAB_CONF = Java.type('java.lang.System').getenv('OPENHAB_CONF');\nload(OPENHAB_CONF + '/automation/lib/hestia/utils.js');\n\nvar logName=\"heatcool\";\n\nvar ok = (items[\"TempSetpoint\"] != NULL || items[\"TempSetpoint\"] != UNDEF ||\n          items[\"MyTempProxy\"] != NULL || items[\"MyTempProxy\"] != UNDEF);\n\nif(!ok){\n  logError(logName, \"Cannot determine heating/cooling: TempSetpoint = \" + items[\"TempSetpoint\"] + \" MyTempProxy = \" + items[\"MyTempProxy\"]);\n}\n\n(ok);"
      },
      "type": "script.ScriptCondition"
    }
  ],
  "actions": [
    {
      "inputs": {},
      "id": "3",
      "label": "Determines whether to turn on/off the heater/ac based on temp and setpoint.",
      "description": "Sends command to Heating/CoolingCtrl to change device's state.",
      "configuration": {
        "type": "application/javascript",
        "script": "var OPENHAB_CONF = Java.type('java.lang.System').getenv('OPENHAB_CONF');\nload(OPENHAB_CONF + '/automation/lib/hestia/utils.js');\n\nvar mode = event.itemName.replace(\"Check\", \"\");\nvar delta = items[\"TempSetpoint\"].floatValue() - items[\"MyTempProxy\"].floatValue();\n\n// TODO: Replace 0 with hysteresis, if heating check for \n// positive dela, if cooling check for negative delta\nvar turnOn = (mode == \"Heating\") ? (delta > 0) : (delta < 0);\n\nvar cmd = (items[mode+\"Mode\"] == \"Boost\" || turnOn) ? ON : OFF;\nevents.sendCommand(mode+\"Ctrl\", cmd);\n\nsleep(10); // keep the rule from running again too soon"
      },
      "type": "script.ScriptAction"
    }
  ],
  "configuration": {},
  "configDescriptions": [],
  "name": "Copy of Heating/Cooling Check",
  "tags": [],
  "visibility": "VISIBLE",
  "description": "Determines when to turn on or off the heating or cooling"
}
Copy the edited JSON and return to the REST API docs and paste into the “body” field and press “Try it out!”
Return to PaperUI and you should now find “Copy of Heating/Cooling Check”. It will have it’s own new unique UID and the original Rule will still show as uninitialized/disabled.
Editing the copy to make your changes
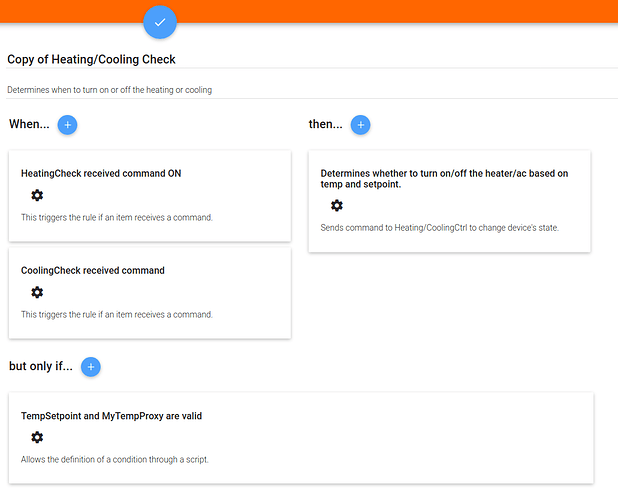
Click on the Rule and it will open a screen showing the three parts of a Rule.
-
When… : This is where you define the events that cause this Rule to run. In this case if HeatingCheck receives command ON or if CoolingCheck receives command ON. Add/remove triggers that will cause the Rule to run here.
-
but only if… : For those familiar with the .rules files in openHAB, this section is new. This is where you can define conditions that must be true before the Rule will run. In this case we have a short little bit of code to make sure that the setpoint and current temperature readings are valid. You can do more interesting things in this clause too. For example, if you attempt to change the temperature unit to something other than F or C, this clause for the Rule that processes that change will revert the Item to what ever it was set to before that.
-
then… : This is where the actions to take place are defined for the Rule. For simple actions like sending a command to a given Item, there is no need for code her, but most of the time a Script Action will define a script that includes some code.
For HestiaPi, the source code for Script Actions and Script Conditionals is Nashorn JavaScript.
In this example, we want to add hysteresis to the decision to turn on or off the heater or air conditioner. I don’t want the heater to come on until the temperature falls below three degrees F below the setpoint and the heater to turn off when the setpoint is reached. That leaves a buffer between when the heater turns on and off which will prevent it from rapidly cycling on and off when the temperature is hovering around the target temp.
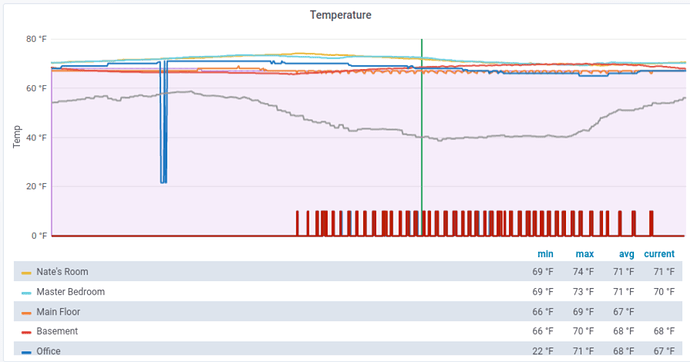
Visually the difference is quite noticeable. Here is a graph without hysteresis:
The graph shows a 24 hour period. Notice all the short little bursts of heating (red bars at the bottom). When you zoom in you will see that there are cases where the heater turned on and off several times over the course of five minutes.
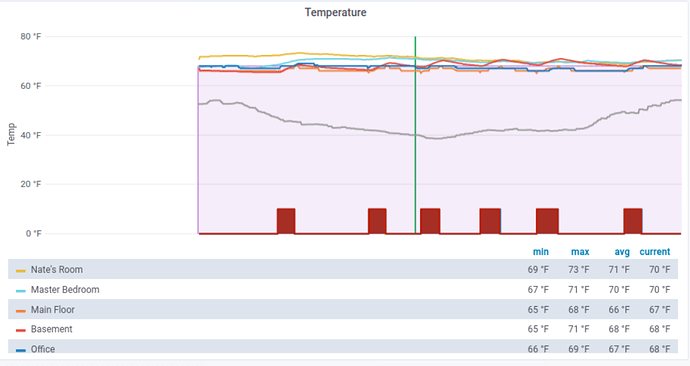
Here is a graph using a 3 degree f hysteresis:
As you can see, the heater comes on for longer periods but far less often. This is easier on the HVAC unit and uses less energy over all.
Click on the cog icon in the then… clause to bring up the script.
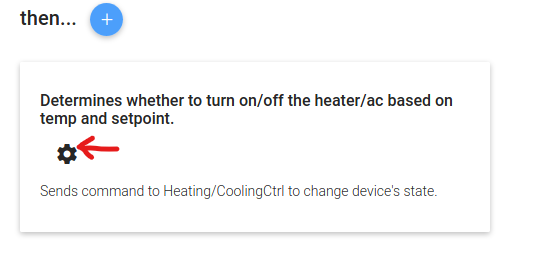
The code itself is in the “Script” text box. The current code is:
var OPENHAB_CONF = Java.type('java.lang.System').getenv('OPENHAB_CONF');
load(OPENHAB_CONF + '/automation/lib/hestia/utils.js');

var mode = event.itemName.replace("Check", "");
var delta = items["TempSetpoint"].floatValue() - items["MyTempProxy"].floatValue();

// TODO: Replace 0 with hysteresis, if heating check for
// positive dela, if cooling check for negative delta
var turnOn = (mode == "Heating") ? (delta > 0) : (delta < 0);

var cmd = (items[mode+"Mode"] == "Boost" || turnOn) ? ON : OFF;
events.sendCommand(mode+"Ctrl", cmd);

sleep(10); // keep the rule from running again too soon
We will expand the line that populates turnOn so it uses a hysteresis buffer.
var OPENHAB_CONF = Java.type('java.lang.System').getenv('OPENHAB_CONF');
load(OPENHAB_CONF + '/automation/lib/hestia/utils.js');

var mode = event.itemName.replace("Check", "");
var setpoint = items["TempSetpoint"].floatValue();
var currTemp = items["MyTempProxy"].floatValue();
var delta = setpoint - currTemp;
var hyst = 3;

var turnOn = (mode == "Heating") ? (delta >= hyst) : (delta < (hyst*-1));
var turnOff = (mode == "Heating") ? (currTemp >= setpoint) : (currTemp <= setpoint);

// Always turn on with boost mode
if(items[mode+"Mode"] == "Boost") turnOn = true;

if(turnOn || turnOff) {
  // If both are true it means we are in boost mode so have turnOn
  // take precidence.
  var cmd = (turnOn) ? ON : OFF;
  commandIfDifferent(mode+"Ctrl", cmd);
}
// do nothing between setpoint and setpoint +- hyst

sleep(10); // keep the rule from running again too soon
Click “OK” and then the blue check icon at the top to save your changes.
Your customized Rule is now live and running, test it out. In this case we can change the temperature setpoint to trigger the Rule to run and make sure it does what it is supposed to without error. If it doesn’t work, add some logging . When you import utils.js (see the second line of the script above) you will get access to logDebug, logInfo, et. al. which you can use to log out to /var/log/openhab2/openhab.log. If you get stuck, ask here on the forum.
If you really run into trouble, it’s a simple matter to revert to the stock Rules. Just disable your new Rule and re-enable the original Rule.
Upgrades
In an upgrade you run the risk of losing your customized Rules. There are several approaches you can take to prevent/recover from this. I recommend the following:
- always run a backup before an upgrade and save the backup.zip file somewhere where it won’t become impacted by the upgrade process (e.g. /home/pi)
- using the REST API and instructions from above, get your modified Rule through the REST API and save it off to a text file; after the upgrade restore the Rule using the REST API. You will want to compare your customized Rule with the new version that came with the upgrade and merge the differences in your restored Rule.
Conclusion
I realize this over all approach seems a bit awkward and I plan on writing some tools that will make it a bit easier. But the advantages of the new JSONDB Rules and this approach include:
- much better boot time
- faster development cycle as it no longer takes 15-20 minutes to parse and load the monolithic .rules file
- you do not need to ssh to the HestiaPi to customize it, almost everything is updatable through PaperUI
- not yet mentioned, but as you make changes through PaperUI, backups are automatically created in /var/lib/openhab2/jsondb/backup
- easier to make changes on an active HestiaPi with a lower risk of breaking it for long periods of time; all you need to do is disable your modified rule and reenable the original rule.
Soon the maintainers of HestiaPi will be cutting a new SD card image with these new JSONDB configs for early adopters to play with. For those who want to get started sooner, see Interoperability with other OpenHAB instance - #11 by rlkoshak which shows the commands needed to upgrade from v1.1 to this pre-alpha/alpha test version.
I’m happy to answer and questions or comments. Good luck!
