Hello for fair warning I’m new to doing DIY projects, but I have background in IT(sysadmin). I do have experience in building customer PC’s and I do know how to solder.
I’m very interested in building and installing a HestiaPi for my A/C unit(US) in order to control it and not be stuck with the mess that is in the consumer market for “smart” thermostats. My primary concern would be how to properly wire my current A/C as my thermostat has 7 wires instead of 5 going to it.
System currently has an C, R(c)w/ wire jumper to R(h), Y, G, S2, W/E and O/B wire. I do know based on my A/C units documentation that the S2 is a sensor wire and not inherently needed to run the system. I’m pretty sure it’s not supported to begin with, but I figured it wouldn’t hurt to include. I do know the O/B wire is very likely needed. I have confirmed my unit is providing 28V AC on the C wire. So I’m pretty sure I can build a unit that uses my A/C’s provided power for the HestiaPi.
Any advice on if my system is supported and/or how to properly wire it would be greatly appreciated.
The HestiaPi software uses openHAB and uses a non supported version. The remote connector will no longer connect because of the outdated version. There has been talk about updating but the pi-zero cannot run the newer versions of openHAB.
It’s always good to check and verify these things though. If you jumper the R to Y, the fan should turn on, R to G for the compressor for cooling, and so forth.
If you can turn on the heating and cooling with W and H (respectively), then you should not need O/B. You will also be supported by the HestiaPi out of the box.
If you can only get heating or cooling, but not both, then you’ll need the O/B wire and the HestiaPi will not work out of the box. It’ll require updating some rules on how to do the controls.
If I was a gambler, I’d say you’ll probably be supported out of the box. Having two R wires implies there are separate heating and cooling systems. But please check and make sure.
As for which open source thermostat project to use, I can say that I am still supporting the software. The latest image uses a supported version of Debian, but what @jrtaylor71 says about OpenHAB being old and not upgradable on the original Pi Zero boards is true. I don’t know anything about a “remote connector” but I can say that I have connected remote temperature sensors to the current HestiaPi.
Here’s the plan for software updates:
split the front end (web browser) and back end (OpenHAB)
upgrade to Debian 12
People with the Pi Zero 2 (which is what all new units are built with) should be able to run both on the thermostat itself. Or they can to run the back end on another machine (a newer Pi, a server, etc.).
People with the original Pi Zero will have to run the back end on another machine if they want to upgradem if they don’t want to set up another server, they can just not upgrade. That’s always an option.
As to the question of when I’ll get to these updates, probably pretty soon, actually. I’ve been getting some other projects to a good stopping point which has freed up some of my time. I’m not going to promise to have it done by a certain date, because life happens, but I’m much more optimistic than I normally am when trying to figure out when I can squeeze in some updates.
So need to quickly clarify the wiring. The system only has a R wire going to my current Thermostat’s R(c), but then has a jumper on the R(c) and R(h) ports on the thermostat. So I’m under the impression O/B will likely be needed for the system to operate properly. My apologies on not making the OP clearer on that.
So looking at the diagram what would be the proper way to wire with a O/B wire? (Apologies I don’t see it referenced and would rather not damage something) After that I’m under the impression I will need to modify configuration files for this properly work. I have no qualms with doing this.
Thank you for continuing to support this! We need more open source out in the world. I will go through with getting a Pi Zero 2 then. I looked at the other project and it’s a bit too complicated for me to add to my plate at the moment and doesn’t appear to be at the same place Hestia is as well if I’m properly understanding it.
How would backend deployments work? Guessing via a docker container to avoid any weird dependency issues.
Ah, thanks for the clarification. I read that as there being two wires and them being jumpered together.
Full disclosure: I haven’t personally worked with a heat pump HVAC system. However, from what I am reading, it looks very similar to traditional HVAC controls.
First, we will test everything to verify it works as expected. You don’t need to disconnect your thermostat for this. Here are the tests:
Use a wire or paperclip or something to connect R + Y. The fan should turn on. The compressor should not.
Connect R + Y and R + G at the same time. The fan should turn on, the compressor should turn on, and it will likely blow cold air. There are some manufacturers who reverse their controls so it blows hot by default, so if that happens, don’t panic, just make a note of it
Connect R + Y, R + G, and R + O/B at the same time. The fan should turn on, the compressor should turn on, and it will likely blow hot air. Unless the last test blew hot air, then this should blow cold.
Connect R + Y and R + E at the same time. The fan should turn on, the compressor should not, and it should blow hot air. If the emergency heat hasn’t been used in a while, it may smell like dust is burning. It likely is, and that’s normal.
If any of those tests don’t give you an expected result, stop testing and report back here. If everything goes as expected, then the HestiaPi can work for you with some modifications to the rules.
Here’s my revised list of what each wire controls now that I believe you have a heat pump:
C Common
R hot wire
Y fan (Edit: compressor, likely cooling by default)
G compressor (Edit: Fan)
S2 outdoor temperature sensor
E emergency/electric heating
O/B reversing valve for Heat Pump systems
And from now on, I’m going to refer to the iFixIt post on what the wires are for a thermostat. They do a very good job at being concise!
The upcoming split
As to the questions of how deployments would work for a split system (thermostat front end and server back end), I was planning on the main solution to be a Raspberry Pi image. This doesn’t require anyone to have a traditional server or know how to use docker, LXC, any VM hypervisors or anything else. Just plug it in, tell the front end how to connect to the server, and voilá, it should work.
I also plan to cater to people who do have some kind of server infrastructure or want to set one up for this. This gets a little tricky becsuse I don’t want to force people to use a particular solution (e.g. Docker) against their will. That means I can’t do what many projects do: publish a Docker image and tell people to either use Docker or you are on your own.
My plan is to use Ansible for this, which is the same tool that builds the Raspberry Pi images today. So the same code can be used for whatever technology people want to use:
Point it at a physical server
or a VM on Proxmox, Hyper-V, ESXi, or whatever
or spin up a Docker container and point it there
or an LXC container
or… well you get the idea
I don’t have to do extra work configuring additional technologies, and users get something they can use no matter which technology they like. It seems like everyone wins.
Once I get a little further down this path, I’ll make a new thread about this.
Thank you for the response. Life got busy and I was not able to get to my A/C unit until today.
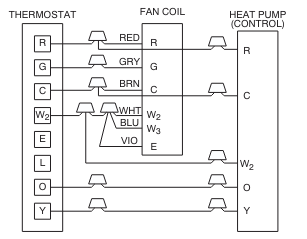
The fan unfortunately did not start the fan when I did R+Y when I attempted to jump the system.
I double checked the wiring diagram that came with the fan coil unit… 99% sure that should have worked, but I’m not entirely sure why it didn’t. I’ve attached a snip of the diagram if that will be of help. This is from the documentation that came with it and not exactly as it’s wired on the thermostat as it has the added S2 and the wire on the thermostat is labeled W/E. Though thinking the heat pump has it’s own wiring/documentation, but haven’t had the much success finding that.
I believe that it actually turned on the compressor/heat pump. I’m going to do some more testing this weekend when I have some more free time jump wires to confirm. I’m thinking R+G will turn the fan on.
I believe you’ve mixed around G and Y.
G is fan and Y is cooling. Some systems expect the fan to be turned on first (connecting R+G) before starting cooling (R+Y) or heating (R+W). Try that and let us know
Oops. Yeah. It’s funny, I was looking at that exact same diagram when I came up with that mapping and somehow I still got them switched around. Thanks for the correction.
You were correct, thank you very much with helping. I ended up blowing a fuse on the unit while testing all the wires. Thankfully I was able to get one at a local automotive store easily.
I confirmed thaf R+G is fan. R+G+Y is cooling. R+G+Y+O/B is heating, and R+G+E is for heatstrip heating.
So I will now need to figure out how best to connect and configure everything.
Wanted to follow on this that I’ve gotten in all the needed parts and assembled everything. I was able to successfully boot up the Pi verify that everything appears to be properly loaded on to it as well.
Currently still unsure how to properly wire the system and then make needed configurations to the software to ensure proper compatibility with my heat pump. Any further assistance on this would be appreciated. If more details are needed on my end just let me know and I’ll get back as soon as life allows me to.
I can help get you going in the right direction here. The key place to look is in the OpenHAB Rules. I don’t have a thermostat set up right now that I can play with, but I made a post about it for another community member a few months ago here:
Looking at that particular .json file is something even I avoid any time I can, but the web UI is reasonable. Once you make the changes, you’ll want to back up /var/lib/openhab2/jsondb/automation_rules.json so it’s easy to restore if you ever need to re-image your SD card.
In the rules, you’ll see this variable called “SystemType” in a few places. These control whether the relays Heating, Cooling, Hot Water, [de]humidification, and so on. The values are either “US” or “EU” which line up with the wiring diagrams on the wiki. The values are not ideal since there are systems in the EU which have cooling, and systems in the US which have [de]humidification, but they work well enough that I’m not too motivated to change them.
I would suggest you create a third option for SystemType which is something like “HeatPump”. Then, look for all the rules that use SystemType. This is where the code will turn on a certain relay (or set of relays) when the heat or cooling is turned on, or turn off a relay when those features are turned off. Your system will be more similar to the US mode than the EU one, as you have the exact same functionality (heating, cooling, fan, and stage 2 heating).
You can find the relay mappings on thei wiki. You’ll have to pick which relays you want to use for which features. I’d suggest trying to make them match existing hardware wiring where possible. For example, connect the fan to G, the compressor to Y (since it’s most similar to “cooling”), and the emergency heat to W2.
If you have any questions about the code, post them here. I didn’t write the code, but I’ve read it a fair number of times and had to make some custom modifications for my home system in the past (we have radiators and didn’t want the fan to turn on when the heat came on, for example). There are other people who have experience in this department lurking on this forum too.
If you implement it as a third SystemType, we should eventually be able pull your changes into the official HestiaPi SD card image. It’s just important that everything works exactly the same as the current software works now when it’s in US or EU mode.
Once you have changes ready, I’ll review and test your changes, and it’ll be up to @HestiaPi to do the official merge into the git repo.
I wanted to mention that I added support for heat pumps and posted about it in the thread on testing the v1.5-dev release.
It’s undecided if this feature will make it into the v1.5-dev release or will be in a future release, but feel free to chime in on the thread linked above if you would like to get in your 2 cents.
cc: @N0YKG since you asked about something similar in another thread. What I did isn’t exactly what you were looking for, but it’s very close. And @jay too!