Manual install? I want to keep some other things running on my R Pi

Your last commit on hestiapi.sh does not include the calibration block from above.
Please change the 4 numbers on line 165.

That should make all LCD areas work.

Please allow 10-15 minutes on the very first run before visiting the web UI or a phone App. Keep in mind that the webUI keeps some connection open and retries to connect in the background, so if you had a tab open on your browser from a previous successful boot, don’t just leave it open.

Did a one character edit on kiosk-xinit.sh to fix that.

Sooo Buster is running fine… next stop upgrade openHAB! :woozy_face:
@rlkoshak are your instructions still valid with today’s OH version (coming from 2.5.12) ?

I don’t know. Which instructions in specific are you referring to here? I don’t think I wrote any upgrade instructions yet and I’m certain there will be some necessary changes to the config. The rules should pretty much work as written but OH 3 completely dropped support for 1.x version bindings. IIRC when I reworked the rules we were still using the 1.x GPIO binding (because there wasn’t a 2.x version binding yet). There is now a 2.x style GPIO binding but that means working with Things now instead of Item configs.

So the PinXX Items would need to be reworked (probably best to make the managed like all the rest) and of course the new binding would need to be installed and a Thing created and configured.

Beyond that, I think everything else is OH 3 ready.

There are also a ton of new features that we can use to greatly reduce the complexity and amount of rules code including profiles and Units of Measurement (we can get rid of everything that deals with converting between degrees F and degrees C for example), the semantic model, etc. But all that can and probably should wait until what we have now is working on OH 3.

At a high level the process would be as follows:

  1. Use apt to install the latest OH 3 release. The installer will make all the changes necessary to migrate the managed configs (Thing, Items, Rules) to OH 3.

  2. Install the new GPIO binding.

  3. Use MainUI (replacement to PaperUI) to create a new GPIO Thing and configure the channels for the four pins we use.

  4. Remove default.items.

  5. Recreate the PinXX Items using MainUI.

  6. Test

I’m reasonably confident that will work. Once that’s working on OH 3, it’s probably worth while to look into (in no particular order):

  • retrofit our Items into the semantic model

  • configure the Overview page in MainUI and consider removing BasicUI and the sitemap for admin and phone control

  • rework the Items and shell scripts to use Units of Measurement (we can standardize on degrees C everywhere and only convert to degrees F on the UI and the MQTT messages we publish to the UI), we can get rid of a bunch of Items doing this as well

  • rewrite the rules using the JS Scripting add-on which will let us use ECMAScript 11 instead of the ancient ECMAScript 5.1 we are using now (which will go away as a default when OH moves from Java 11 to Java 17 probably some time this year). This also comes with a helper library that provides something close to a pure Java Script environment. This too will allow for a good deal of rules simplification.

  • move some of the rules config stuff out of defaults.js into Items so they can more easily be configured by end users where necessary (MainUI now has widgets to enter all sorts of stuff including free text and date times that can’t be done in sitemaps)

  • look into adopting Timeline - UI Widgets - openHAB Community (or something like it) to set the schedule

  • With the helper library that comes with the JS Scripting add-on, it’s really easy now for rules to call each other and to work with Item metadata. We should be able to use that to not only further simplify rules but also eliminate a whole bunch of Items.

The sensor on my test unit gave up and I’ve unplugged it. Next time I get a chance I’ll see if I can bring it back out and ruin the upgrade on it to verify this but it might take a bit so don’t wait on me.

Thank you @rlkoshak, clear as always. You are right, there were no upgrade instructions…
Will look into these the following days…
@hestia_hacker I recall the load before installing the LCD script was reasonable but now I noticed this:
image
Saw some open issues on LCD and framebuffer repos that may be related…
Although performance-wise, it feels fine, we should not just leave it like this.
Will double check.
Regarding the upgrade steps from rlkoshak, how would these be described/applied to your scripts?

I’ve made that change in 99-calibration.conf and rebuilt the buster image.

Here are the results:

  1. The LCD touchscreen did not work (see below for more details)
  2. The LCD did have the splash screen telling me to connect my phone to the AP
  3. The LCD also did have the countdown screen telling me the pi’s IPv4 address
  4. The web interface worked fine to turn on the air conditioning
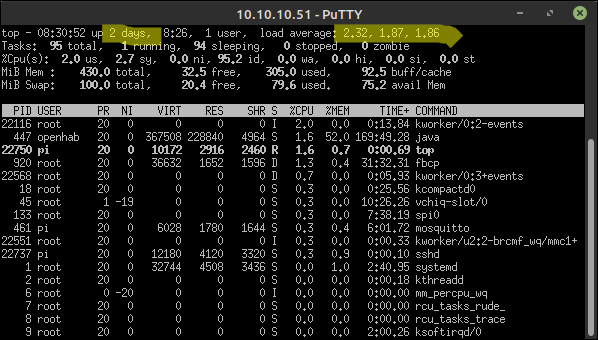
 :snowflake: :sweat_smile:
  5. Performance
    a. Load average is about 1.8
    b. 49.3% of memory is used by OpenHAB
    c. 27M of memory free ; 96M of memory available ; 430M total (per top and free)
    d. 75M/100M of swap space is available

When I say the touch screen didn’t work, I mean not even the information button, which worked fine for me before this last iteration. I did notice mashing on the screen can cause text to get selected, which is probably a clue. It seems that clicks are registering… somewhere.

Next I compared these values to what are in the 1.2-dev release and I found the calibration file wasn’t even there on that HestiaPi. So I thought it might be a good idea to remove that file from the buster image all together. Nope. That caused clicks on the extreme right of the screen to register on the far left. So by clicking on the right half of the info button, I could get the heating menu to appear.

The other question I had was whether using these new numbers for buster is going to mess up the old builds for jessie and stretch? If they need separate values, I can do that without any trouble, I just need to know which values to use on which Debian versions.

I tried running ts_configure based on this tutorial and the crosses didn’t show up on the screen and the console only output the screen resolution. But after 4 or 5 taps, it spit out configuration values (which I’m sure are wrong). I also tried ts_test and that didn’t print anything on the LCD, but it did print out some data. Unfortunately it didn’t have headers nor did the man page explain what the columns were. It looks like the first value is a unix timestamp and the last value might be the pressure being applied, but the middle two weren’t comprehensible. I’ll paste the raw data below in case anyone else can make sense of it.

1653000379.971880: -25101     82    144
1653000379.990920: -25197     96    145
1653000380.009165: -25285    109    146
1653000380.029155: -25352    118    146
1653000380.057829: -25441    131    147
1653000380.077236: -25479    136    147
1653000380.097009: -25390    124    145
1653000380.128814: -25198     96      0

1653000387.338400:  25002  -7124    121
1653000387.348802:  25002  -7124      0

1653000397.049019:  -2076  -3256    148
1653000397.077452:  -1988  -3269    148
1653000397.096696:  -1935  -3276    149
1653000397.115649:  -1905  -3280    149
1653000397.128787:  -1816  -3293      0

1653000403.540141:  13438   3938    145
1653000403.559136:  13581   3918    145
1653000403.598795:  13653   3907      0

That’s from me clicking in the top left, top right, bottom right, bottom left (in that order). For completeness, I also put the calibration file back and then ran ts_calibration, which still didn’t put any squares on the screen, but it was more productive in that it showed me some output.

root@raspberrypi:~# ts_calibrate 
xres = 480, yres = 320
Took 2 samples...
Top left : X =  276 Y = 3727
Took 6 samples...
Top right : X =  388 Y =  343
Took 5 samples...
Bot right : X = 3710 Y =  407
Took 6 samples...
Bot left : X = 3731 Y = 3820
Took 4 samples...
Center : X = 1971 Y = 2067
466.451416 0.002600 -0.111777
27.493958 0.064867 0.000862
Calibration constants: 30569360 170 -7325 1801844 4251 56 65536

These numbers do not look much like the calibration numbers form 99-calibration.conf though, so I’m not really sure where to go from here. I’m not sure what might read /etc/pointercal so I deleted that to clean up after myself.

Just for kicks, I blindly jammed “30569360 170 -7325 1801844 4251 56 65536” in for the Calibration Option in the xorg conf file. I knew it was probably wrong, but it didn’t seem any more nonsensical than the other magic values, so what the heck, right? Clicks didn’t register anywhere. Mashing on the screen could get seemingly arbitrary text to be selected, but generally unhelpful.

So overall, the build seems to be going pretty smoothly. It just seems to be this touchscreen issue that I need to sort out. If anyone can shed any light on what these calibration numbers mean or how I can obtain the correct ones (and, ideally, also verify that they are the correct ones), let me know and I’ll see if I can get numbers that will work work everyone on every version of Debian. Thanks.

I’m kinda stuck here with this screen calibration issue. If anyone has any suggestions on how I can figure out the right magic numbers, please let me know.

It’s been about a month, so I figured I’d give people an update on my script to automate what would otherwise be a manual install.

Since I need the screen to work, and I can’t seem to get that to happen with the image that I build (but it works fine with the official 1.2-dev image), I’ve decided to pivot a little bit and try to get things working with the Raspberry Pi Zero 2.

It is not going well. I have yet to be able to boot an emulated Pi Zero 2 in qemu. I believe that if I switch Linux distros so I can get qemu 6.1 or later, I might be able to make that happen. If so, that will speed up my ability to iterate.

I also tried running the existing script on hardware. I had to make some modifications, but all of the commands run without error up to the point where I wait for the web server to come up on port 8080. It never does. The openhab2 service is running just fine, but nothing is listening on port 8080 (per ss -ltpn and curl agrees). Nothing in the OpenHAB logs stuck out at me.

I’ll compare the services running on my functioning HestiaPi (on the 1.2-dev image) with the ones running on the Zero 2 to try to track down what should be listening on port 8080 and why it’s not.

Update as of 2022-07-24.

It’s about time for my monthly update.

Automated builds

I’ve sorted out some of the issues with my infrastructure and the build process is much more reliable now. The issues were mainly things timing out due to lack of CPU power or disk I/O, or processes getting killed due to memory pressure.

I have not made any process on the touch screen, but it occurred to me that the current 1.2-dev image works fine for everyone and it doesn’t have this calibration stuff. Maybe that’s a thread we could pull?

If all else fails, I guess the images could be used without a screen (maybe just post the IP address on the screen instead?). It’d certainly be inferior to the previous releases though. :face_with_diagonal_mouth:

64-bit support (aka running on the Raspberry Pi Zero 2)

I have a Raspberry Pi Zero 2 and I found that it can only seem to run bullseye. When I try the arm64 version of buster, it just sits at the rainbow test pattern and never boots. Flashing the bullseye image on in the exact same manner results in a bootable image. I’m going through the scripts and running each command manually to figure out what’s going to work.

The big problem right now is that when I run OpenHab2, it consumes all CPU power within a few mintues. We’re talking it takes 20 seconds to run “uptime” and load averages over 25. Basically, everything falls apart. I tried using both java 11 (openjdk) and java 8 (zulu) and both of them are acting the same. It doesn’t really make sense since this CPU is supposed to be faster, and yet, it’s a very real problem none-the-less. I only spent about 6 hours on this, so maybe something will come to me and I’ll be able to figure out what’s using all this CPU time.

I am able to use the little tiny screen as a terminal. So there’s at least some LCD screen support working. A lot of the package are now in the package manager, so that’s really nice.

This topic was automatically closed 91 days after the last reply. New replies are no longer allowed.